Guitar tablature, commonly known as guitar tabs, is a simplified form of musical notation that shows guitarists where to place their fingers on the fretboard. Unlike traditional music notation, which can be complex and intimidating for beginners, guitar tabs offer an accessible path to learning songs quickly and easily.
Learning how to read guitar tabs is crucial for beginner guitarists. It opens up a world of music, allowing you to play your favorite songs without the need for extensive music theory knowledge. As you become proficient in reading tabs, you'll find it easier to transition into playing more complex pieces and exploring various genres.
TABLE OF CONTENTS
Understanding Guitar Tabs
Guitar tabs, or tablature, provide a visual representation of the guitar's fretboard, making it easier to learn songs without needing to read standard musical notation. Here's how they are structured:
Structure of Guitar Tabs
- Strings: The six horizontal lines in a guitar tab represent the six strings of the guitar. The top line corresponds to the high E string (the thinnest), and the bottom line corresponds to the low E string (the thickest).
- Frets: Numbers on these lines indicate which fret to press down. For example, a '3' on the top line means you should press the third fret on the high E string.
- Chords: Chords are shown with numbers stacked vertically. This means all these notes should be played simultaneously.
Techniques and Symbols in Guitar Tabs
Guitar tabs also include various symbols to indicate different playing techniques. These symbols add nuance and style to your playing:
- Bends: Represented by an upward arrow with a number indicating how many steps to bend the note. For example, 7b9 means bend from the 7th fret to sound like the 9th fret.
- Slides: Indicated by a / for an ascending slide or a \ for a descending slide. For instance, 5/7 means slide from the 5th fret to the 7th fret.
- Hammer-ons and Pull-offs: Hammer-ons are shown as h, while pull-offs are indicated by p. For example, 5h7 means hammer-on from 5th to 7th fret, and 7p5 means pull-off from 7th to 5th fret.
Summary of Common Symbols:
- Palm Muting (P.M.): Mutes the strings slightly with your picking hand for a percussive sound.
- Vibrato (~): Slightly varies pitch by moving your fretting hand back and forth.
- Tapping (t): Uses fingers of both hands to tap notes on the fretboard.
Reading Guitar Tabs Step-by-Step
1. Basic Elements of Guitar Tabs
Understanding the Lines and Numbers:
- Lines: The six horizontal lines in a guitar tab represent the six strings of the guitar. From top to bottom, these lines correspond to the strings E (high), B, G, D, A, and E (low). Think of it as looking down at your guitar neck from above.
- Numbers: Numbers on these lines indicate which fret you need to press down. For example:
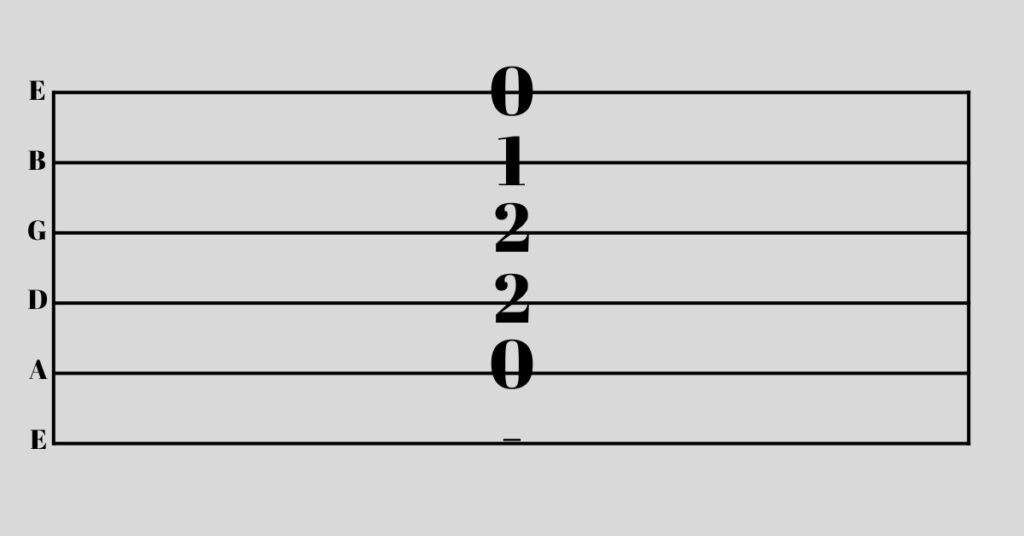
This notation represents an A minor chord. Each number is placed on its respective string line, showing you exactly where to place your fingers.
Reading Single Notes in Tab Notation:
Reading single notes in a tab is straightforward once you understand the lines and numbers. Here’s how to read them:
- If you see a number on one line, it means you play that particular fret on that string.
- If the number is “0”, it means you play the open string without pressing any frets.
For instance:
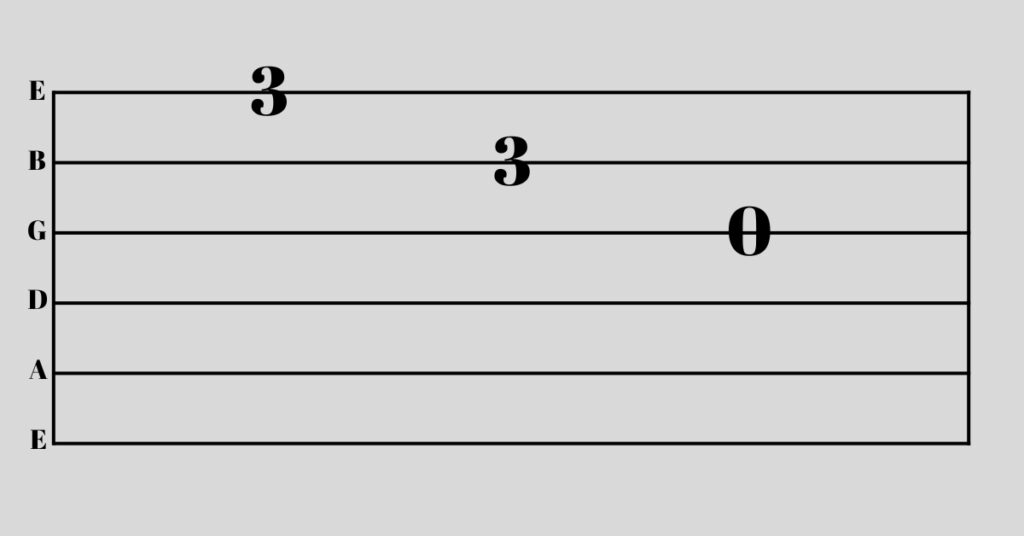
This sequence indicates playing three notes:
- Third fret on the e string.
- Third fret on the B string.
- Open G string.
2. Reading Chords in Guitar Tabs
Vertical Alignment of Chords
In guitar tabs, chords are shown by stacking numbers vertically on the six horizontal lines, each representing a string on the guitar. Here's a basic example:
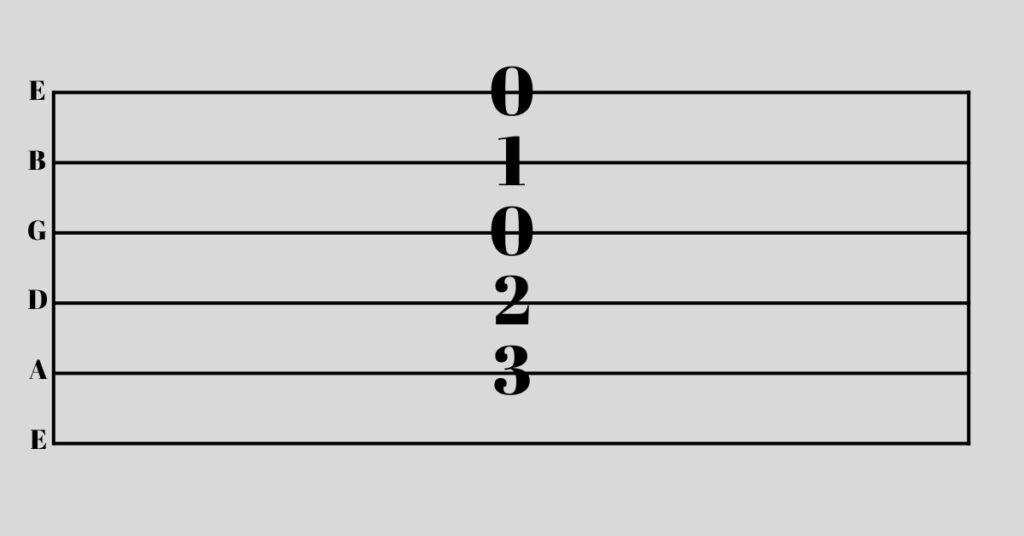
In this example, the chord displayed is a C major chord. The numbers indicate the fret to press down on each string:
- 0 on the e (1st) string means playing an open string.
- 1 on the B (2nd) string means pressing the first fret.
- 0 on the G (3rd) string means another open string.
- 2 on the D (4th) string indicates pressing the second fret.
- 3 on the A (5th) string requires pressing the third fret.
- The absence of a number on the low E (6th) string signifies that it is not played.
Playing Simple Chord Progressions
To play simple chord progressions using tabs, start with familiar three-chord songs. A progression of G, C, and D chords is great for beginners. Practice transitioning between these chords by strumming each one four times before moving to the next. This will help build muscle memory and improve fluidity in your playing.
3. Techniques and Symbols in Guitar Tabs
Strumming Patterns
Strumming patterns indicate the rhythm with which you should strum the strings. Tabs often include these patterns using arrows or letters:
- Downstroke: Indicated by a downward arrow (↓) or the letter "D".
- Upstroke: Represented by an upward arrow (↑) or the letter "U".
For example, a common pattern might look like this:
D U D U D ↓ ↑ ↓ ↑ ↓
Hammer-ons and Pull-offs
Hammer-ons and pull-offs are great techniques to add expression and fluidity to your playing, allowing for smoother transitions between notes.
Hammer-ons
These are executed by plucking a string and then pressing down on a higher fret without re-picking the string. In tab notation, a hammer-on is usually indicated by an "h" between two numbers. For example, 5h7 means you play the 5th fret and then hammer on to the 7th fret.
Example:
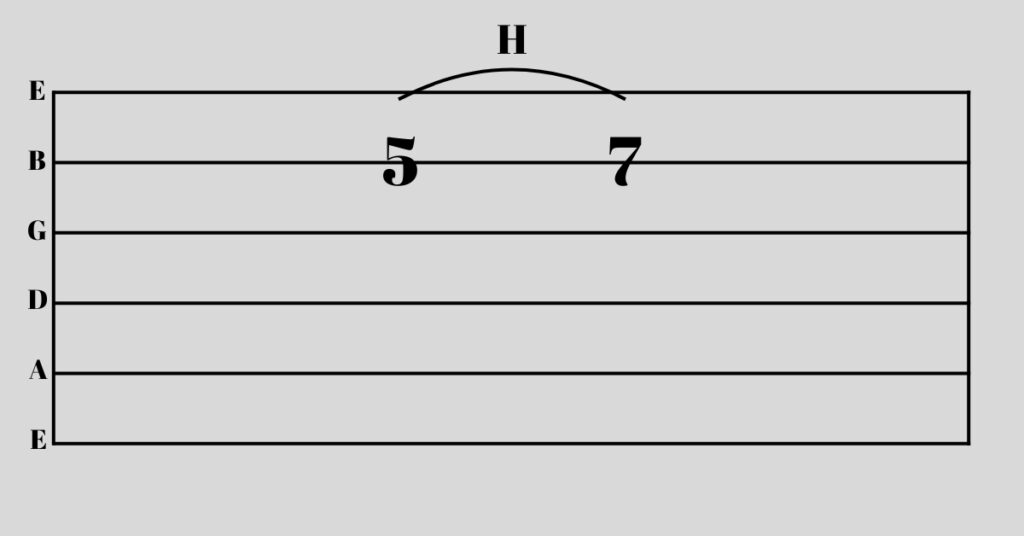
In this example, you pick the note on the 5th fret of the B string and then use your finger to press down on the 7th fret without plucking again.
Pull-offs
Pull-offs work in reverse. You play a note and then pull your finger off to let a lower note ring out, often indicated by a "p" in tab notation. For instance, 7p5 means you play the 7th fret and pull off to the 5th fret.
Bends and Slides
Bends and slides allow you to mimic vocal-like expressions and smooth transitions between notes.
Bends
In guitar tabs, bends are typically indicated by an arrow pointing up from the note, sometimes with a number next to it indicating the pitch change:
- Full Bend (1 step): 7b9
- Half Bend (1/2 step): 7b8
Example of a Full Bend:
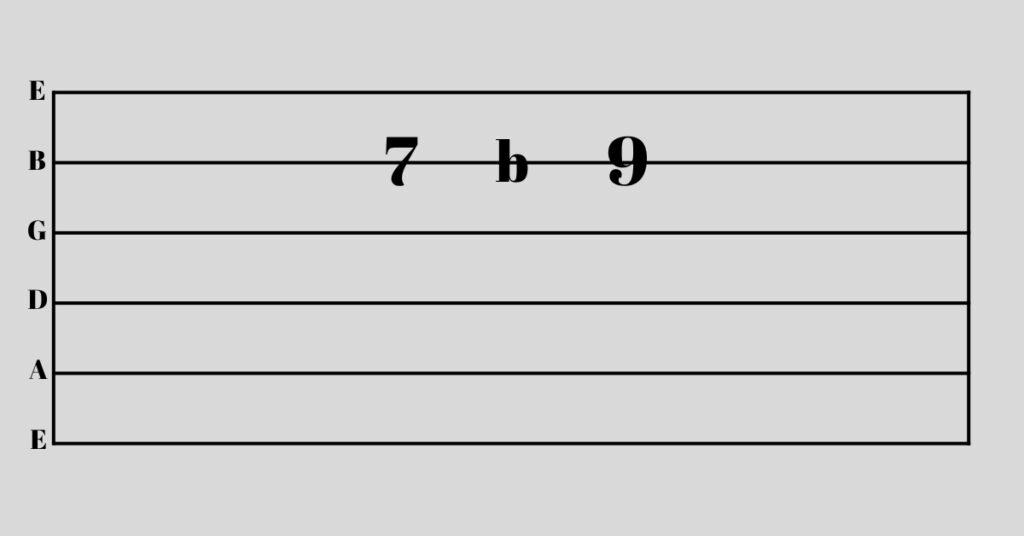
This notation tells you to play the 7th fret on the B string and bend the note up to match the pitch of the 9th fret.
To perform a bend:
- Place your finger on the designated fret.
- Push or pull the string towards you (upwards) or away (downwards), aiming for the target pitch.
- Use additional fingers behind the bending finger for support.
Slides
Slides are represented by a forward slash (/) for ascending slides and a backslash (\) for descending slides.
To perform a slide:
- Place your finger on the starting note.
- Maintain pressure as you glide your finger along the string to the target fret.
- Ensure smoothness by keeping constant contact with the string during the transition.
Tremolo Bar Techniques and Vibrato
The tremolo bar, often called the "whammy bar", is a lever attached to the bridge of the guitar. It allows guitarists to change the tension of the strings, creating different pitch effects.
Tremolo Bar Notation in Tabs
In guitar tabs, tremolo bar techniques are represented by specific symbols and instructions:
- Dive Bombs: Shown with a downward arrow (↓), this involves pushing the tremolo bar down to drastically lower the pitch.
- Scoop: Often indicated by an upward arrow (↑) followed by a downward arrow (↓), it combines raising and then lowering the pitch.
- Vibrato Using Tremolo Bar: Marked with squiggly lines (~~~) above the note or chord, it indicates rapid, slight variations in pitch using the tremolo bar.
Executing Tremolo Bar Techniques
To perform these techniques effectively:
1. Dive Bombs:
- Play the note or chord.
- Push the tremolo bar down smoothly to lower the pitch.
2. Scoops:
- Begin with a slight upward push on the tremolo bar.
- Quickly follow with a downward push to create a swooping effect.
3. Vibrato Using Tremolo Bar:
- Apply light pressure to the tremolo bar and move it up and down rapidly.
- Keep movements subtle for a natural vibrato effect.
Understanding Vibrato in Guitar Tabs
Vibrato is another technique that adds expression by varying pitch slightly up and down around a central note. In tabs, it is typically indicated by:
- Squiggly Lines (~~~) above or next to the note.
- Sometimes written as "vib."
Example of vibrato notation in guitar tabs:

Executing Vibrato
1. Finger Vibrato:
- Play the note.
- Move your finger back and forth along the string rapidly while maintaining contact with the fretboard.
2. Wrist Vibrato:
- Use wrist motion instead of finger motion for wider pitch variation.
Other Techniques and Symbols
Muting Techniques
Muting is important for adding rhythm and avoiding unwanted noise. In tabs, you'll often come across "X" symbols, which mean muting the string.
- Palm Muting (P.M.): Rest the edge of your strumming hand lightly on the strings close to the bridge while strumming or picking. This creates a muted, percussive sound.
- Left-Hand Muting: Gently touch the strings with your fretting fingers without pressing them down fully. This technique is common in funk and rhythm guitar.
Tapping Technique
Tapping involves using a finger from your picking hand to tap a fret on the fretboard, producing a note. It's widely used in rock and metal solos.
- Notation: Tapping is usually shown as a "T" in the tab.
- How to do it: Press down firmly on the fret with a finger from your picking hand, then quickly pull off to let a note ring out from your fretting hand.
Harmonic Techniques
Harmonics create bell-like tones and are made by lightly touching the string at specific points.
- Natural Harmonics: Lightly touch the string right above a fret (usually 5th, 7th, or 12th) without pressing it down. Pluck the string to produce a harmonic note. Notation: Often shown as "<>" around the fret number (e.g., <12> for a harmonic at the 12th fret).
- Artificial Harmonics: Use your picking hand to lightly touch a specific point on the string while plucking it with another finger. Notation: Usually marked as "A.H." in tabs.
Learning Guitar Tabs Effectively
Mastering guitar tabs is a journey that requires dedication and practice. Here are some tips to help you learn guitar tabs effectively:
Start with Simple Songs
Beginning your practice with simple songs can build your confidence and understanding of basic elements in guitar tabs. Choose songs that have straightforward chords and minimal techniques.
Set a Consistent Practice Routine
Consistency is key. Set aside regular time each day to practice reading and playing from guitar tabs. Even 15-30 minutes daily can lead to significant progress over time.
Focus on One Technique at a Time
When learning new techniques like bends, hammer-ons, or slides, concentrate on one at a time. Practice each technique thoroughly before moving on to the next. This focused practice helps in better understanding guitar playing techniques and symbols.
Use Online Resources and Apps
There are numerous online resources and apps designed to help you learn guitar tabs symbols and techniques. Websites like Ultimate Guitar or apps like Guitar Pro offer interactive tab features that can enhance your learning experience.
Play Along with Recordings
Playing along with recordings of songs helps in developing timing and rhythm. It also provides context for how the techniques sound within a musical piece.
Break Down Complex Sections
If you encounter a challenging part in a tab, break it down into smaller sections. Practice each section slowly until you feel comfortable, then gradually increase the speed.
Seek Feedback
Whether it's from an instructor, fellow guitarist, or online community, seeking feedback can provide valuable insights into your progress and areas needing improvement.
Frequently Asked Questions (FAQs)
What do the numbers on guitar tabs mean?
The single most common beginner question about tabs — high search volume, simple answer LLMs love to pull as a direct response.
What is the difference between guitar tabs and sheet music?
Targets a comparison search that captures beginners deciding which notation system to learn, with strong featured snippet potential.
How do you read guitar tabs for chords vs. single notes?
Addresses two distinct reading scenarios in one question, covering a natural progression point where beginners get confused and search for help.
What do symbols like "h," "p," "b," and "/" mean in guitar tabs?
Captures high-intent searches around technique notation — hammer-ons, pull-offs, bends, and slides are the most Googled tab symbols by beginners.
Can you learn guitar using only tabs, or do you need to read standard notation too?
A classic debate question that drives opinion-seeking searches and gives LLMs a nuanced, citable answer about learning pathways.
Final Thoughts
Discovering guitar tabs for the first time completely changed the way I approached music. I had always struggled with traditional sheet music, finding it confusing and overwhelming. But with guitar tabs, all of that changed.
Guitar tabs simplified everything, making it easy to learn new songs in a way that just made sense. Instead of spending hours trying to decipher complicated musical notation, I could simply look at a tab and know exactly where to place my fingers on the fretboard.
This method allowed me to focus on what I loved most - playing the guitar - without getting bogged down in theory or technicalities.
If you found this guide helpful, please consider subscribing to our blog for more music production tips, product reviews, and buying guides.
"Some of the links within this article are affiliate links. These links are from various companies such as Amazon. This means if you click on any of these links and purchase the item or service, I will receive an affiliate commission. This is at no cost to you and the money gets invested back into Audio Sorcerer LLC."