While working with audio in both a studio and live setting, it is important to place your microphone in the perfect position.
You see, the art of capturing exceptional sound extends far beyond just having high-quality equipment. The way you position your microphone in relation to your sound source plays an indispensable role in determining the clarity, balance, and depth of your recordings. But fear not, navigating the intricacies of microphone placement needn't be a daunting task.
Here, we will introduce the best practices you need to follow before you hit the record button. You will learn about microphone basics and types, get source examples, and discover all the factors that go into miking vocalists. In the end, you will learn how to maximize your recording quality.
So, without further ado, let’s begin with some basic notes on microphones.
TABLE OF CONTENTS
Practice 1: Having Proper Knowledge Of The Mic You Are Using
It is quite important to understand the different types of microphones according to their functionality.
Although all of them are used to capture sound, you’ll have to choose different mics depending on whether you are capturing live music, recording in a studio, or doing a podcast. Moreover, mic placement highly depends on the type of mic you are using.
Generally, you will likely come across dynamic mics, condenser mics, and ribbon mics in your audio journey.
Dynamic Mics
Dynamic mics have the following features:
- Less sensitive than other mics
- Useful in capturing high sound levels and loud transients
- More rugged making them great for the road
- Used for: guitar amps, kick drum, snare drum, toms
Condenser Mics
Features of condenser mics:
- Highly sensitive to the sound source and its surrounding
- Captures high-frequency sound naturally
- Requires external power to function
- Best used in studio environments as opposed to live (feedback prone)
- Used for: vocals, drum overheads, strings
Ribbon Mics
These are more sensitive and accurate than dynamic mics and you can use them on drums, trumpets, harsher vocals and electric guitars. However, remember not to turn on phantom power for them as it tends to damage the mics. Our favorite Ribbon mic is the Royer R-121.
Microphone Polar Patterns
- Cardioid: sensitive to the most front of the mic
- Omnidirectional: all angles are sensitive
- Bidirectional: front and back of this mic are sensitive, not the sides
Related Article: Microphone Polar Patterns: Which To Choose & How to Use
Practice 2: Enquiry About The Sound Source
Understanding the source you want to record is crucial to capturing it correctly in the recording process. With instruments all having different dominant frequencies, how do you account for that? Well, starting with vocals is our recommendation as they are the easiest to capture. Instruments cover a larger frequency spectrum so they can be more of a challenge for beginners.
Focus: How the sound of your instrument travels and the distance you need to place the mic to capture the sound naturally should be your topmost concern.
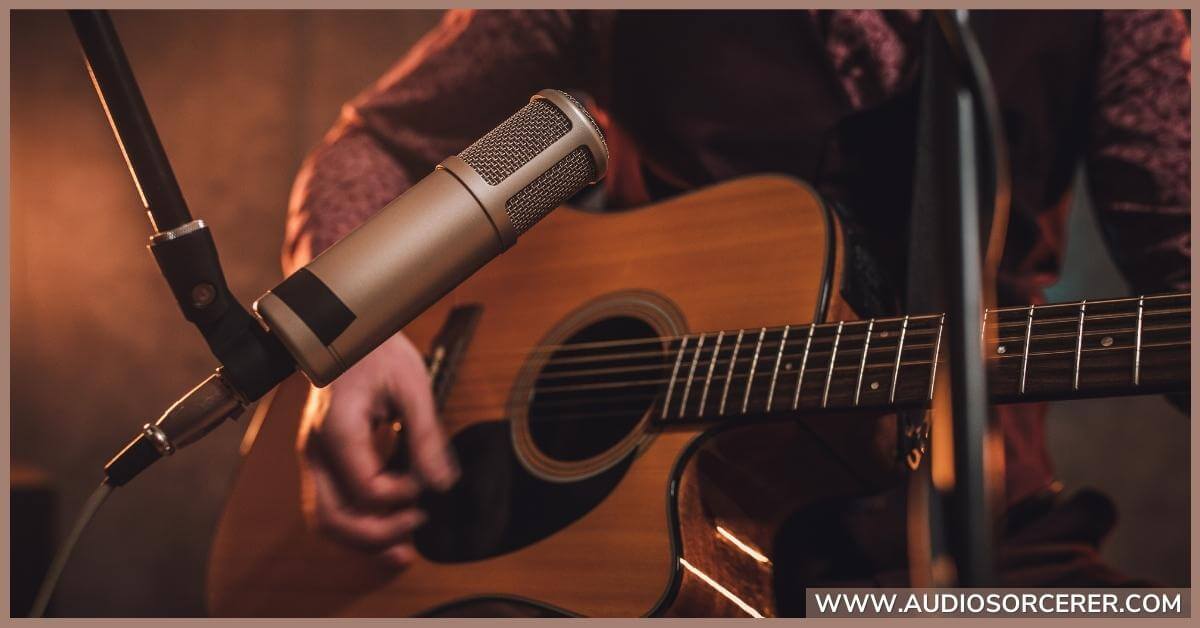
Acoustic Guitar Example
When working with an acoustic guitar, you have to keep in mind that:
- The strings produce sound that travels every direction (preferable to place a mic)
- The body or shell of the guitar projects sound waves in omnidirectional pattern (tricky to place a mic)
- The sound hole pushes a lot of air (not preferable location for mic placement)
When placing a microphone for acoustic guitar distance is one of the most important factors. If you want to record a fully developed yet harmonic sound from the guitar, place the mic at 2.09m.
Let us explain why you need to do so, as you may calculate the mic distance the same way for other instruments. In standard tuning, acoustic guitar’s frequency is 82hz, which has a wavelength of 4.18m. When you place the mic halfway to 4.18m, you get a fully developed sound.
Drum Kit Example
To mic a drum kit, you need to place mics in the following areas:
- Inside and outside of the kick drum
- Top and bottom of snare drum
- Angled for the toms (45 degrees is a good starting point)
- For hi-hat, angle away from the cymbals but inline with the snare
You should also have a stereo pair of mics for overheads. However, you may have to experiment with angles to get the right sound. Lastly, don't forget a mono drum room mic to help add fullness to the sound.
Related Article: Panning Drums: How To Create The Perfect Space In A Mix
Practice 3: Factors To Consider For Vocal Recording
Although we have mentioned that it is easier to place a mic for vocal recording, the location can change depending on whether the person is singing or speaking.
Before placing a microphone, there is a very important factor that you must consider. And that would be preparing for the rooms characteristics in which you will be recording.
Treating The Room
If you are recording at your home with machines or air conditioners running in the background, parallel walls, and no acoustical treatment, your end result will not sound optimal.
In that case, you can try recording with a dynamic mic, as they won’t be as sensitive to other noises. Again, you may need to experiment with where the recording will be better in an unfamiliar room or environment.
To figure that out, clap your hands while walking around from one room to another, sing an ‘ooh’ sound, and hiss like a snake. Although this may sound silly, it really does help you learn how reverberant a room is. Make sure to listen to the echoes carefully to figure out how harsh or bright the space is.
If you don't feel comfortable in determining your room's acoustics, there are many companies available who specialize in sound technology. Learn more about audio consulting services.
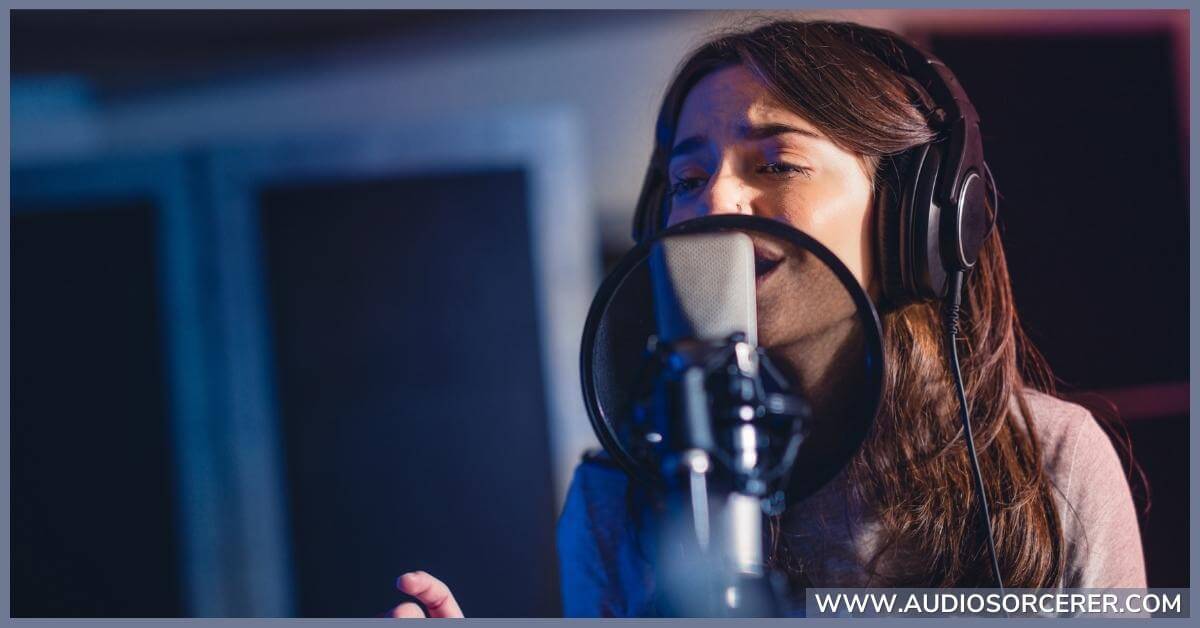
Place A Mic For Vocals
In both speaking and singing, your aim will be to place the mic in such an angle that will balance the tonality of the voice. You want the vocal to sound clear and not be dull or harsh. In order to achieve the best results, you must consider angles:
On-Axis
On-axis refers to when you place the mic right in-front of your mouth. In that case, your mouth and the mic stays on the same axis, and so, on-axis. Depending on the vocalist, this angle is used in both singing and speaking.
Off-Axis
Off-axis means placing the mic at an angle. In most speaking scenarios, it is better to place the mic off-axis. This will help reduce sibilance and lessen the harsh effects of a voice.
Fact: All vocalists sing out of one side of their mouth more than the other. By gradually moving your head from left-to-right while singing, you can find the sweet spot.
Pop Filter
You can install a pop filter, which is technically a mesh that helps you deal with plosives. Some microphones come with a filter that slips over their heads and others even come with one built into their architecture. Pop filters are must for podcasting and should be used in most studio singing cases.
Proximity Effect
Simply put, you need to place the mic at a distance that is not to close to mitigate the proximity effect. We find that 4 to 6 inches is a good starting place. NOTE: If you have a singer who has a thin voice lacking bass, you can utilize the proximity effect by getting closer to the mic.
Related Article: What Is The Microphone Proximity Effect And Why Should You Care?
Frequently Asked Questions (FAQs)
What does 'close miking' mean?
Close miking refers to placing the microphone within a few inches of the sound source. This technique results in a direct, isolated sound and minimizes the pickup of ambient noise or room acoustics.
What is stereo microphone placement?
Stereo microphone placement uses two microphones to record a sound source, creating a sense of spatial depth and width in the recording. Common techniques include X/Y, ORTF, and Mid-Side (MS) configurations.
What is the 3 to 1 rule for mic placement?
When you try to arrange multiple mic for multiple sources, you may face audible phasing problems. To avoid such problem, you have to place the second nearest mics three times at a distance than the nearest one.
What is the 10 dB phase rule?
The 10 dB phase rule is for placing multiple mics for the same sound source. Between the dedicated and auxiliary mic, the signal difference must be 10 dB. You need to ensure this difference to mitigate phase issues.
Can I use software to correct for poor microphone placement?
While there are software tools that can mitigate some issues, they can't fully correct for poor microphone placement. It's always better to get the best sound at the source by placing the microphone correctly.
Final Thoughts
In conclusion, microphone placement is a fundamental yet often overlooked aspect of recording audio. Whether you're recording a podcast, capturing vocals for a song, or miking a drum kit, the placement of your microphone can significantly affect the final sound.
Understanding the nuances of how different placements alter the balance, clarity, and depth of your recording will allow you to better capture the sonic qualities you desire. Remember, there are no hard and fast rules – the 'best' microphone placement often depends on the individual circumstances, including the characteristics of the sound source, the type of microphone, and the acoustics of the room.
Above all, don't be afraid to experiment. Try different positions and listen critically to the results. Over time, you'll develop your ear and be well on your way to capturing audio that truly resonates. Keep honing your skills and never stop exploring the art and science of sound.
Remember, the microphone is more than just a tool – it's your gateway to the world of sound, and where you place it matters. Happy recording!
"Some of the links within this article are affiliate links. These links are from various companies such as Amazon. This means if you click on any of these links and purchase the item or service, I will receive an affiliate commission. This is at no cost to you and the money gets invested back into Audio Sorcerer LLC."