There's a certain magic to the sound of an acoustic guitar. Whether it's the soft strumming in the background of your favorite ballad, or the vigorous plucking that drives a lively folk song, the tones and nuances of this instrument can set the mood for any musical piece. But, capturing the true essence of an acoustic guitar in a recording is an art form of its own.
For both professional sound engineers and home recording enthusiasts alike, the challenge of getting that perfect guitar sound is ongoing. Mic placement, room acoustics, and the type of microphone used are just a few factors that come into play.
In this blog post, we'll dive deep into the tried-and-true techniques on how to mic an acoustic guitar. So, whether you're recording for a Grammy-winning album or just sharing your tunes on social media, these techniques will elevate your sound game. Ready to strum your way to perfection? Let's dive in!
Understanding The Basics
Before diving into the intricacies of how to mic an acoustic guitar, it's essential to lay a strong foundation by understanding some fundamental concepts.
The Anatomy Of Sound
At its core, sound is vibration. When you pluck a guitar string, it vibrates and resonates through the body of the instrument, producing a distinct tone. Different areas of the guitar emit unique tonal qualities, from the bright sounds near the bridge to the warm tones close to the neck.
Directional Vs. Omnidirectional Mics
Microphones come in various polar patterns that determine how they pick up sound. Directional mics, like cardioids, are more focused, capturing sound primarily from one direction. In contrast, omnidirectional mics pick up sound from all around, which can be great for capturing the guitar's overall ambiance.
Room Acoustics
The space in which you're recording plays a significant role in the sound quality. Hard surfaces can reflect sound, causing echoes, while soft materials can absorb it. Being aware of your room's acoustic properties will help you make informed decisions about mic placement and treatment if needed.
Mic Distance And Position
The proximity and angle of the microphone to the guitar can drastically alter the recorded sound. Even moving a mic a few inches can make a noticeable difference!
Single-Mic Techniques
The beauty of recording an acoustic guitar lies in its simplicity. Sometimes, using just one microphone can capture the authenticity and richness of the instrument. There are several single-mic techniques that professionals swear by. Here, we'll explore two of the most popular methods: 12th fret positioning and sound hole positioning.
12th Fret Position
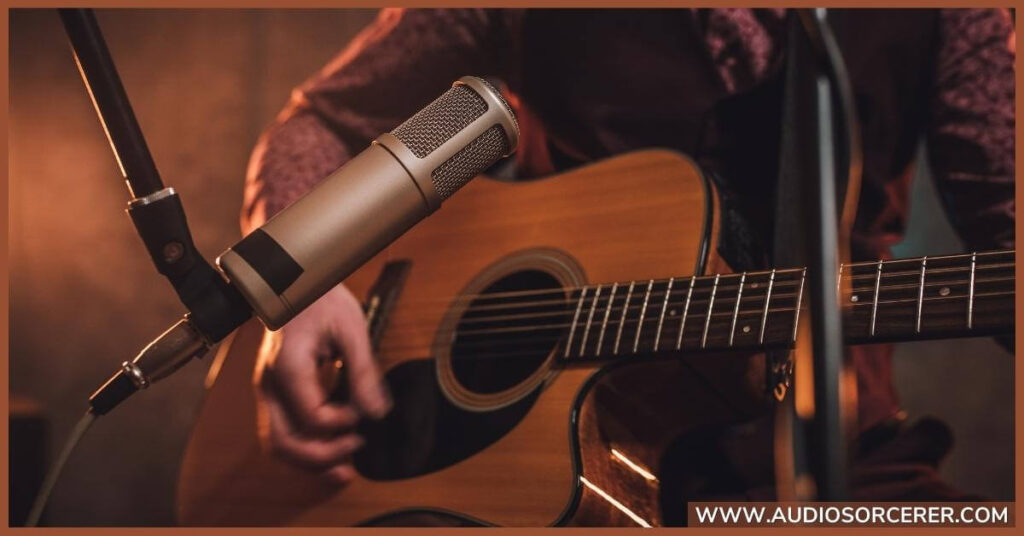
The 12th fret of a guitar is often considered the sweet spot for capturing a balanced sound that brings out both the lows and highs of the instrument. Here's how to get it right:
- Placement: Position the microphone approximately 6-12 inches away from the 12th fret. This distance can vary depending on your specific mic and the sound you're aiming for.
- Angle: Point the microphone slightly towards the sound hole. This approach helps to capture the full body of the sound while avoiding any potential harshness or over-brightness.
- Experiment: Depending on the song and guitar type, slight adjustments in mic angle or distance might be required. Don't be afraid to test different setups to achieve your desired tone.
Sound Hole Position

While the sound hole is the primary source of the guitar's resonance, placing a mic directly in front of it might result in a boomy or bass-heavy sound. Here's how to effectively utilize sound hole positioning:
- Placement: Instead of pointing the microphone directly into the sound hole, place it 2-8 inches off-center. This helps capture the resonance without being overwhelmed by the bass frequencies.
- Angle: A slight angle towards the fretboard can balance out the bass with the treble frequencies, giving a full and rich sound.
- Fine-tuning: Each guitar and microphone combination has its unique character. It's always beneficial to play around with positioning and angles to achieve the most balanced and vibrant sound for your specific setup.
Stereo Miking Techniques
While single-mic techniques can produce great results, their biggest disadvantage is lacking any dimensional spread. If you’re looking for a wide sound, you should consider stereo miking techniques, especially if the acoustic guitar is the highlight of your piece. Here’s a quick look at the most popular options.
X/Y Technique
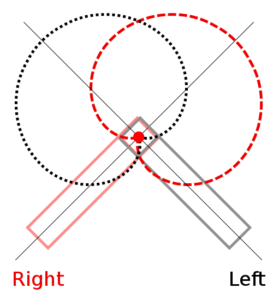
This is one of the simplest and most commonly used techniques for stereo miking an acoustic guitar. In this technique, you place the two microphones so that their diaphragms are extremely close to each other, but at a 90-degree angle from one another.
To set this one up, you should place the two microphones (preferably of the same model) so that their meeting point is at a spot similar to the 12th fret positioning. You should also make sure that there’s enough distance from the guitar (6 to 10 inches) to avoid the proximity effect.
This method gives a sound similar to the 12th fret positioning but with a more complete range, as it picks up both the warm tones of the guitar body and thinner tones coming from the neck. Since the only difference between the two microphones is how they’re angled, the X/Y technique also has excellent mono compatibility, as you can still hear all the music elements on either side.
A/B Or Spaced Pair Technique
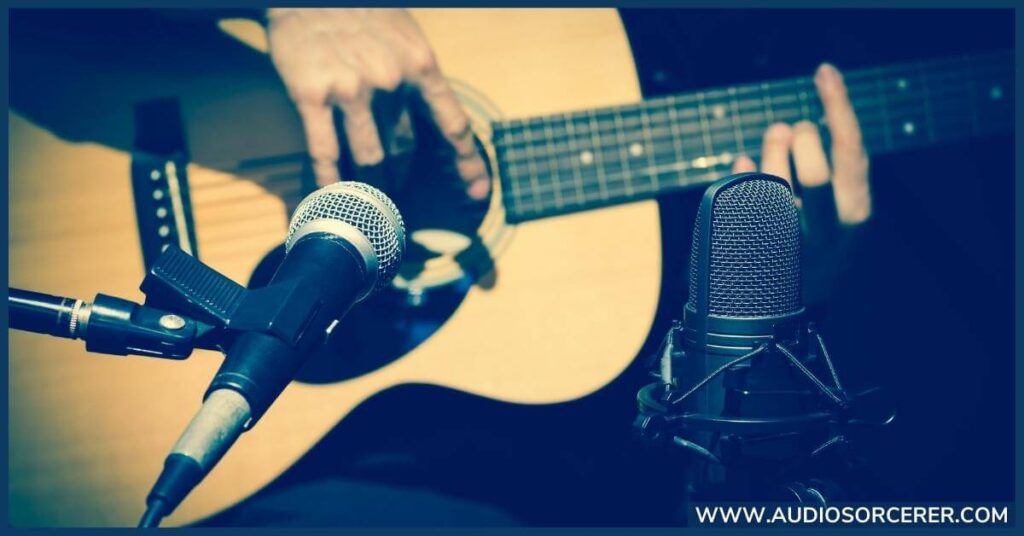
The X/Y method is great at providing a deeper edge compared to mono techniques, but it doesn’t take full advantage of stereo capabilities, and that’s where the A/B or Spaced Pair method shines! In the A/B technique, you place the two mics at different positions around the microphone, so that the distance between the mics is three times the distance of each microphone to the guitar.
The setup for this technique should also be around 6 to 8 inches from the guitar where one mic is placed a few inches off the center of the sound hole and the other placed according to the previous spacing rule. This technique works great with diaphragm condenser mics. In fact, using a larger one near the sound hole and a smaller one near the neck is typically recommended to get a deeper, more intricate sound.
Following the spacing rule is quite essential because this technique can easily run you into potential phase issues. This is where the sound waves picked by the two spaced-out microphones end up destructively interfering with each other, which is a problem you don’t have to worry about with the X/Y technique.
Mid-Side (M/S) Technique
In mid-side miking, the main (preferably larger diaphragm) mic is placed facing the center of the guitar (much like the 12th fret positioning), while the other (smaller diaphragm) microphone is placed 90 degrees from the guitar, typically right above the main mic.
The main benefit of this technique is that it provides a fuller sound profile while recording and excellent mono compatibility. Additionally, since the microphones are placed so close to each other, the technique suffers little to no phase issues like the A/B technique.
One thing to keep in mind is that this technique is highly sensitive. This means that it can pick up any resonance, reverberation, or sound across the room, which is why it’s better suited for studios and other treated spaces.
Advanced Miking: Near And Far Mic Technique
Beyond single and stereo mic techniques, there are other ways to introduce depth into your acoustic guitar recordings. One such advanced method is the near and far mic technique. This setup involves positioning one microphone close to the guitar and another further away, capturing both the detailed tonality and the ambient room sound.
Near Mic Placement
The near microphone is responsible for capturing the direct sound from the guitar. Here's how to optimize this placement:
- Positioning: Start with a familiar position, such as the 12th fret or sound hole, as discussed earlier.
- Distance: Keep the near mic 6-12 inches from the guitar. This proximity will ensure you capture the instrument's intricate details and nuances.
- Orientation: Adjust the mic's angle to balance between capturing string brightness and body warmth.
Far Mic Placement
The far microphone, often known as the room mic, captures the ambiance and the natural reflections of the room. This adds depth and space to your recording.
- Positioning: Place the far mic several feet away from the guitar, often opposite the near mic or in a location that captures a good representation of the room's sound.
- Height Consideration: Elevating the far mic can sometimes yield a more spacious sound, capturing the room's upper reflections.
- Direction: Point this microphone towards the guitar. However, if the room has unique acoustic properties that you'd like to capture, try orienting the mic towards those areas.
Blending The Two
Once you've recorded using both mics:
- Listen Separately: Play back the recordings of both microphones independently. This will give you a clear idea of what each mic is contributing.
- Balance: Mix the two tracks together, starting with the near mic as the primary sound source. Gradually blend in the far mic recording until you achieve a balanced, full-bodied sound.
- Phase Considerations: Ensure there's no phase cancellation when combining the two sources. If the combined sound seems hollow or lacking in certain frequencies, you may need to adjust mic positions or use software tools to correct the phase.
Microphone Recommendations For Acoustic Guitar Miking
Now that you know more about the different techniques on how to mic an acoustic guitar, you might be wondering about the best possible options for microphones.
As previously established, single-mic techniques usually require a reliable large diaphragm microphone. Some good options here would be:
- Rode NT1 Condenser Microphone
- Lewitt LCT-440-Pure Condenser Microphone
- Neumann TLM 103 Condenser Microphone
On the other hand, for stereo techniques, you can use a combination of the previous large-diaphragm mics along with small diaphragm (pencil) mics or use a set of small diaphragm mics instead. You can find a variety of good options for various budgets here too, such as:
- Rode M5 Small-diaphragm Condenser Microphones
- Shure KSM137 Small-diaphragm Condenser Microphones
- Neumann KM 184 MT Stereo Set Condenser Microphone
Final Thoughts
With that said, our guide on how to mic an acoustic guitar comes to an end. As you can see, you can mic your acoustic guitar in a variety of ways, depending on your preferences and the intended sound quality.
In the end, don’t forget to subscribe to our blog for more guides, tutorials, and reviews to take your music setup to the next level!
"Some of the links within this article are affiliate links. These links are from various companies such as Amazon. This means if you click on any of these links and purchase the item or service, I will receive an affiliate commission. This is at no cost to you and the money gets invested back into Audio Sorcerer LLC."