There are many misconceptions regarding upward compression. Some people believe it to be indistinguishable from downward compression, while others mistake it for expansion. Some beginners don’t even know this tool exists!
Well, we’re here to tell you that upward compression is one of the most useful techniques in audio mixing. Once you learn how to use it, your tracks will never be the same.
If you’re unsure where to start with upward compression and when to use it, this article is for you. So, keep reading to learn more!
What Is Upward Compression?
Upward compression is a somewhat less commonly discussed form of dynamic range compression. Unlike standard (downward) compression, which reduces the amplitude of audio signals above a certain threshold, upward compression increases the amplitude of audio signals below a set threshold.
Like downward compression, the overall effect is controlled by the ratio setting. For example, with a 0.5:1 compression ratio, for every 2 dB the input signal is below the threshold, the output will increase by 1 dB.
The goal of upward compression is to raise the level of quieter parts of a recording, making them more audible without significantly affecting the louder parts. This is particularly useful in cases where you might want to bring out subtle nuances or background details.
7 Uses For Upward Compression

Upward compression is an exceptional tool to use in conjunction with downward compression. It can completely transform your mixing process.
For example, if you want a certain note to pop, using upward compression to bring it up to the threshold will do the trick. In contrast, it wouldn’t make sense to squish most of the track to match the washed-out sections.
While you can get by just fine without using upward compression, here are 7 situations where this compression type would be indispensable.
- Restoring Low-Level Details: In some recordings, especially older ones or those captured in less-than-ideal conditions, subtle details might be buried. Upward compression can help emphasize these nuances.
- Post-production for Film & TV: In dynamic scenes where whispers suddenly turn into shouts, using upward compression can make the quieter dialogue more audible without drastically affecting the louder sections.
- Podcasts and Interviews: Sometimes, due to microphone positioning or the speaker’s dynamics, parts of an interview might be much quieter than others. Upward compression can help level out the speech so that every word is clearly audible.
- Enhancing Ambient Sounds: In sound design, upward compression can be useful in emphasizing background noises or environmental sounds, providing a fuller, more immersive soundscape.
- Restoring Transients: In scenarios where transients have been dulled (either through earlier processing or recording issues), upward compression can sometimes help in restoring some of their prominence.
- Acoustic Guitar: When recording or mixing a fingerstyle acoustic guitar, the player’s dynamics can vary widely. Upward compression can bring up the level of the softer plucks and strums, ensuring a consistent presence in the mix.
- Vocal Enhancements: Upward compression can be used to elevate the nuances in a vocal performance, such as breath sounds or subtle vocal inflections, making the performance feel more intimate and raw.
Related Article: Compressor Cheat Sheet | The Only Guide You’ll Ever Need!
Upward Compression Vs. Downward Compression
Upward and downward compression are both valid techniques. Though, each has its own uses. Understanding the difference between the two will help you find the perfect use for them.
Signals
The main difference between upward and downward compression is how they affect the audio signals. Compression typically kicks in when the threshold is met. Yet, upward compression works on the signals below the threshold, raising it by a specific ratio, while downward compression influences the signals exceeding the threshold, bringing them down.
Ratio
You can control your compressor through the ratio of compression. Adjusting the ratio sets the tone on how the compressor will act and which signals it’ll modify.
Downward compressors typically have a ratio of 2:1, 3:1, or 4:1. These figures indicate that the signal above the threshold will compress by half, third, or fourth of its original loudness, respectively.
Naturally, since upward compressors act on the opposite side of the threshold, the ratio is also flipped. If the compression ratio is 0.5:1, the level of the signals below the threshold will double.
Uses
Since upward compressors reduce the volume of signals above the threshold, the resulting sound is usually quieter. In contrast, if you want to reduce the dynamic range while retaining the volume of the track, upward compression will do the trick.
Compressors, whether they act above or below the threshold, are valuable mixing tools. Each type of compressor has its uses in mixing, but to achieve the best result you should use them together.
Tip: To get a smooth vocal track where all the words are audible, start with downward compression and then add upward compression at the end of the plugin chain. This will make sure all the starting words and syllables of a phrase are heard.
How Upward Compression And Expansion Differ
Many beginners mistake upward compression for expansion, as they believe the compressor always affects the signal above the threshold. Yet, that’s not the case at all!
Expansion is actually the opposite of compression, regardless if it’s downward or upward. As the names suggest, compression reduces the dynamic range of audio, while expansion increases it.
By now, you probably know how upward compression can amplify lower notes, blending them with higher audio. In contrast, expansion’s purpose is mainly to separate signals further, making the high notes louder and further softening quiet signals.
For this reason, you’ll find expansion to be particularly useful in the following scenarios, as opposed to upward compression:
- Drowning out noises in tracks with too much room sound.
- Separating jumbles of audio into distinct signals.
- Making the volume of the vocals or the instrumentals more distinguished.
Waves MV2: My Favorite Upward Compressor
Interested in getting this plugin? Click the link below.
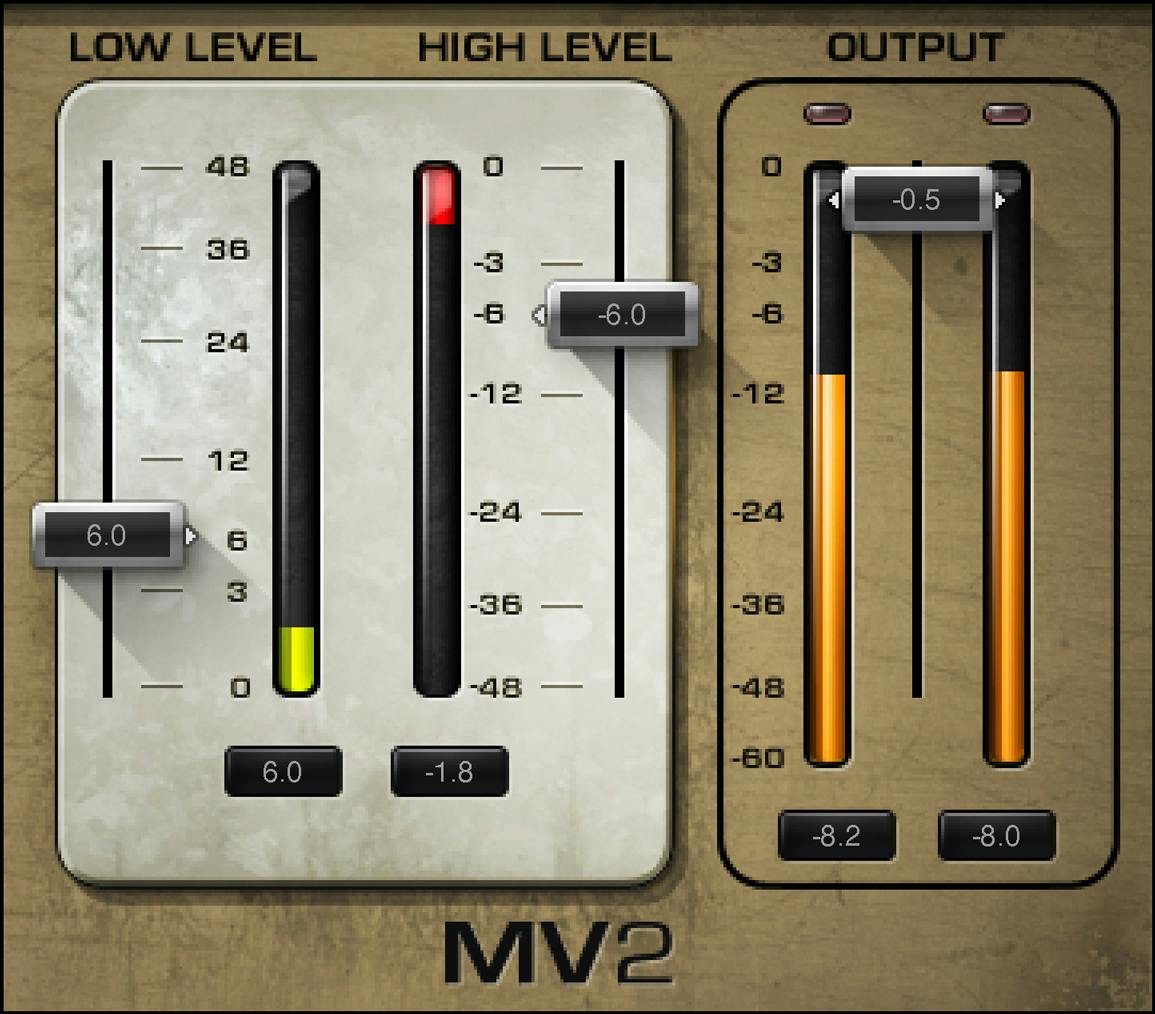
The Waves MV2 is a versatile plug-in that combines both upward and downward compression. It gives you total control over the peaks while still allowing you to boost lower levels. It does it in a transparent way so that you can retain the original character of the recording.
The plugin is simple to use with its only controls being high-level attenuation, low-level boost, and output. Even a beginner can dial in this plugin! It is perfect for shaping your lead vocals, bass, and solo instruments.
If you are looking for a professional sounding and budget friendly upward compressor, then the Waves M2 is where it’s at.
Related Article: The 4 Steps To Properly Applying Compression On Vocals
Final Thoughts
Upward compression, in our opinion, is a severely underrated mixing tool. It shines a light on the softer, often missed details in our audio tracks. Rather than just boosting volume, it’s about bringing out the richness and subtlety of quieter moments.
Whether you’re working on capturing the ambiance in a film, balancing dialogue, or highlighting soft musical notes, upward compression is your go-to. It ensures that every part of the audio, whether loud or soft, gets its moment in the spotlight, leading to a fuller, more balanced listening experience.
Hopefully, you’ve learned how to use a new audio mixing tool! If you want more tips and information on music production, please subscribe to our blog to elevate your audio engineering journey.
“Some of the links within this article are affiliate links. These links are from various companies such as Amazon. This means if you click on any of these links and purchase the item or service, I will receive an affiliate commission. This is at no cost to you and the money gets invested back into Audio Sorcerer LLC.”
Related posts

Understanding RMS in Audio: A Beginner’s Guide
Understanding RMS is important for anyone who works with audio, from musicians and audio engineers to podcasters and content creators.

What Is Audio Mastering? Take Your Music From Good To Great!
Audio mastering is the process of enhancing the overall mix of a music production to make it sound the best it possibly can.
