Applying compression on vocals the correct way is what sets apart a professional mix from an amateur one. Vocals need to be up front, center, and consistent so that they can captivate the listener and pull them in. Compression is the main tool that allows for an engineer to achieve this.
In this article, we are going to discuss the 4 steps it takes to creating a great vocal mix when it comes to compression. We will also go over whether or not you need to use parallel or multiband compression. But, before we get to all that, let's first do a quick dive into what compression is.
What Is Compression In Audio?
Audio Compression reduces the dynamic range of a sound, instrument, or recording. The way the reduction happens is all dependent upon how the parameters of a compressor are set. A compressor can have many parameters but its main 4 are threshold, ratio, attack, and release. Let's discuss these further so you can understand how they affect the compression being applied.
Threshold
This determines the point at which compression will start to engage.
Ratio
This determines how much gain reduction will happen when the sound crosses over the threshold. For example, a 2:1 ratio would reduce the sound 2dB for every 1dB over the threshold.
Attack
This determines how long it takes before the compression kicks in.
Release
This determines how long the compressor stays engages after the sound goes back under the threshold.
Now that you know what compression in audio is, lets now get to the 4 steps to properly applying compression on vocals.
Related Article: Audio Compressor Vs Limiter | Do You Know The Difference?
Step 1 - Decide If Your Vocal Recording Is Too Dynamic

Before you starting do anything to your vocal track you need to determine what shape it is in dynamically. If it wasn't recorded with any compression there is a chance the dynamics are all over the place. This is very common for untrained singers or those who aren't used to the studio environment. If your vocal track falls in this category don't worry because there is something that can be done about it.
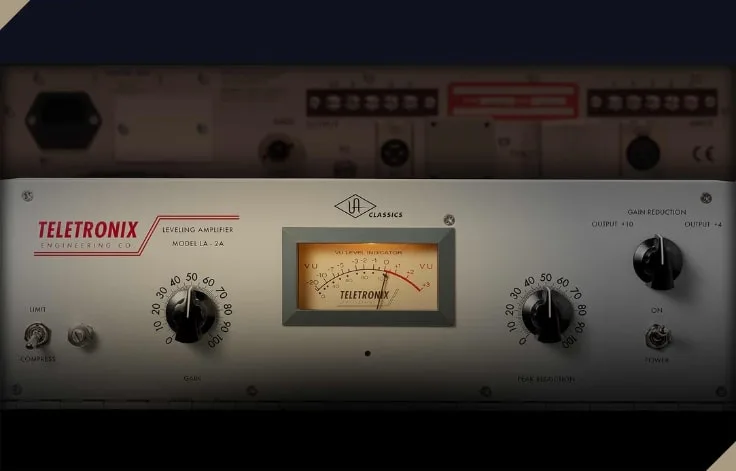
We need to reach for a compressor that will smooth out the vocals but not crush them. We don't want to over compress them in this stage or any stage for that matter. We basically want to replicate what might have been done during the tracking stage. My suggestion is to use a LA-2A compressor.
The LA-2A leveling amplifier is as smooth as they come. It will grab the vocal transients in a transparent way and preserve the integrity of the vocal performance. The key at this point is to reduce some of the peaks but still have a dynamic performance. We want to do the dramatic shaping down the chain.
Here are my recommended settings for the LA-2A Compressor.
- Set to compress
- Get 3 dB to 6 dB of gain reduction
- If the plugin model has a "mix" knob set it to 100%
Step 2 - Apply The 1176 Compressor (The Blue Model)
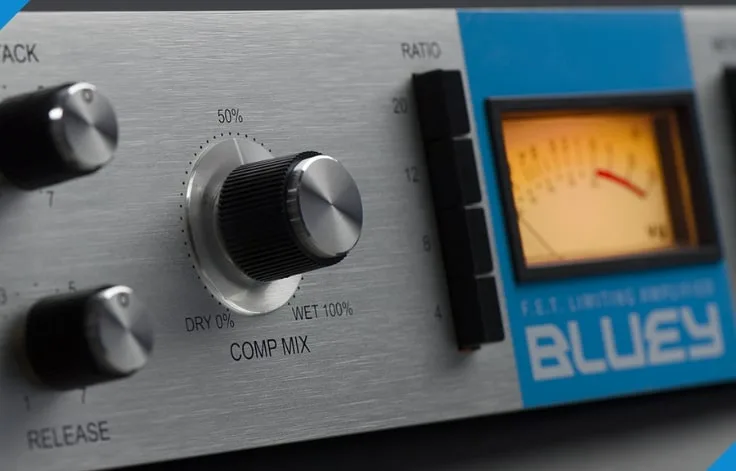
Whether your vocal was dynamically good to start with or you added the LA-2A, this is the part where the true magic happens. Adding the Blue 1176 compressor to a vocal in any genre of music will give it character, warmth, and attitude. There truly is no other compressor like this in the history of audio and none that sounds as good on vocals.
The Blue 1176 compressor should come after your tape emulation and channel strip plugin (or eq plugin) assuming you are using those. It's main purpose is to do the heavy lifting of compression on vocals. Now, depending on the genre you may or may not want to go as hard with it. To be honest, I almost always use it the same as long as the song isn't a ballad. The harder you push it with my purposed settings, the grittier it will sound.
Here are my recommended settings for the Blue 1176 Compressor.
- Set the attack to around 3
- Set the release to the fastest setting which is actually 7
- Get between 7 dB and 10 dB of gain reduction at the loudest peaks
Step 3 - Smooth Out The Vocal With The LA-2A Compressor
You may or may not have had to use the LA-2A compressor in step 1. In this step, we are using it for the same purpose but setting it a little bit differently. We are essentially polishing out the sound the Blue 1176 compressor created. It should go right after the Blue 1176 in the chain.
Here are my recommended settings for the LA-2A Compressor.
- Set to compress
- Get 7 dB to 10 dB of gain reduction
- The plugin model needs a "mix" knob so it can be set between 50% - 100%.
NOTE: For point 3 you must use your ears to determine what sounds best. Set it about 3 notches before you feel like the sound is over compressed.
Step 4 - Fine Tune The Vocal Mix With The Waves MV2
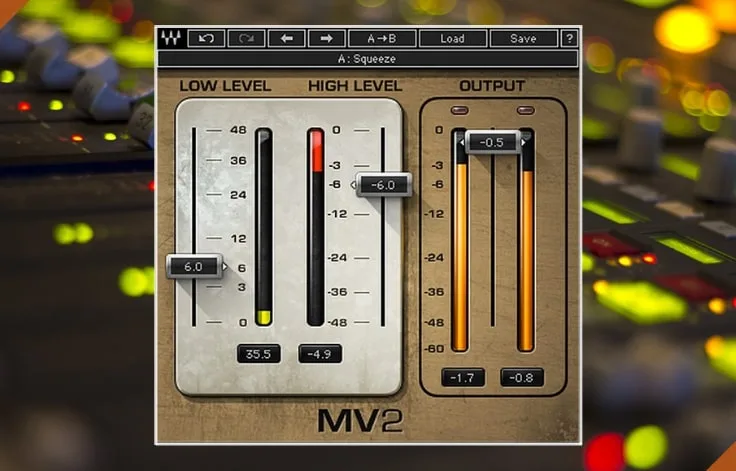
The Waves MV2 is amazing for compression on vocals. It should be one of the last plugins in your chain if not the last. The main purpose of the MV2 is to smooth out any final dips or peaks in the vocal performance. We use this compressor to avoid having to use automation.
The MV2 is special in the sense that it can do upward and downward compression. We have already treated the vocal with a lot of downward compression so we will use this compressor mostly for upward. Upward compression will help unbury the vocal in places where phrases start and any where there is space before singing starts.
Here are my recommended settings for the Waves MV2 Compressor.
- Get 1 dB of downward compression (High Level)
- Set the upward compression fader to between 2.5 and 6 (Low Level)
NOTE: I tend to set the low level fader around 2.5. If you normalize your vocal track to a peak level of -6 dB and keep proper gain staging throughout your signal chain, this will work great every time!
Is Vocal Parallel Compression Necessary?
Parallel compression is very popular when it comes to vocals. The truth is that you don't need to create a separate parallel track like we might do for drums. As you saw in step 3, we are using the LA-2A compressor at a mix setting as low as 50%. This essentially is parallel compression but just on the same track.
Is vocal parallel compression an absolute necessity in a professional mix? Absolutely not.
Do I Need Multiband Compression On Vocals?
Multiband compressors have had their time and place in the audio world but that time has long passed. In the modern day day of mixing everything is about dynamic EQ. Dynamic equalization is a much better way to go about taming specific frequencies or frequency ranges. It is much more transparent, musical, and easier to reach the end goal with.
Multiband compression on vocals is definitely a thing of the past. If you need to tame a specific frequency that is popping out here and there then reach for a dynamic EQ. Trust me, you'll be glad you did.
For dynamic EQ I recommend the Three-Body Technology Kirchhoff EQ.
Best Vocal Compression Settings Recap
I want to just do a quick recap of the 4 steps to properly applying compression on vocals.
Steps
- Apply an LA-2A compressor if your initial vocal recording is too dynamic.
- Use the Blue 1176 compressor for character and to do the majority of your compression.
- Apply an LA-2A compressor with the mix knob between 50% - 100%. This is to smooth out further what the 1176 did.
- Lastly, apply the Waves MV2 mostly for it's upward compression.
At the end of these steps you should have a vocal that is so dynamically smooth across the board that no automation is needed.
Final Thoughts
Now that we've gone through the 4 steps to properly applying compression on vocals, you should be ready for your next mix. You now know good compression settings for vocals and exactly what compressors to use. Trust your ears and let the rest fall into place. Good luck on your audio engineering journey!
If you enjoyed reading this, considering purchasing any of the recommended products from our links throughout the article.
Lastly, check out my "Vocal Dream Team Video" so you can see the Blue 1176 and LA-2A in action before you go!
"Some of the links within this article are affiliate links. These links are from various companies such as Amazon. This means if you click on any of these links and purchase the item or service, I will receive an affiliate commission. This is at no cost to you and the money gets invested back into Audio Sorcerer LLC."