A snare's pitch doesn't come from anything being "screwed on." The head sits on the shell, the hoop seats over it, and tension rods thread down into the lugs. Tighten those rods and the pitch goes up. That's the whole trick.
Tuning a snare isn't a dark art. It's a repeatable process, and once you understand what's happening under your hands, you can dial one in fast and get it back the same way next time.
Here's the full workflow: how to check and seat your heads, the step-by-step tuning order, how the batter and resonant heads work together, pitch targets by genre, dialing in the snare wires, and the modern tools that actually help. Trust your ears, and we'll get you there.
TABLE OF CONTENTS
How a snare drum actually makes its pitch
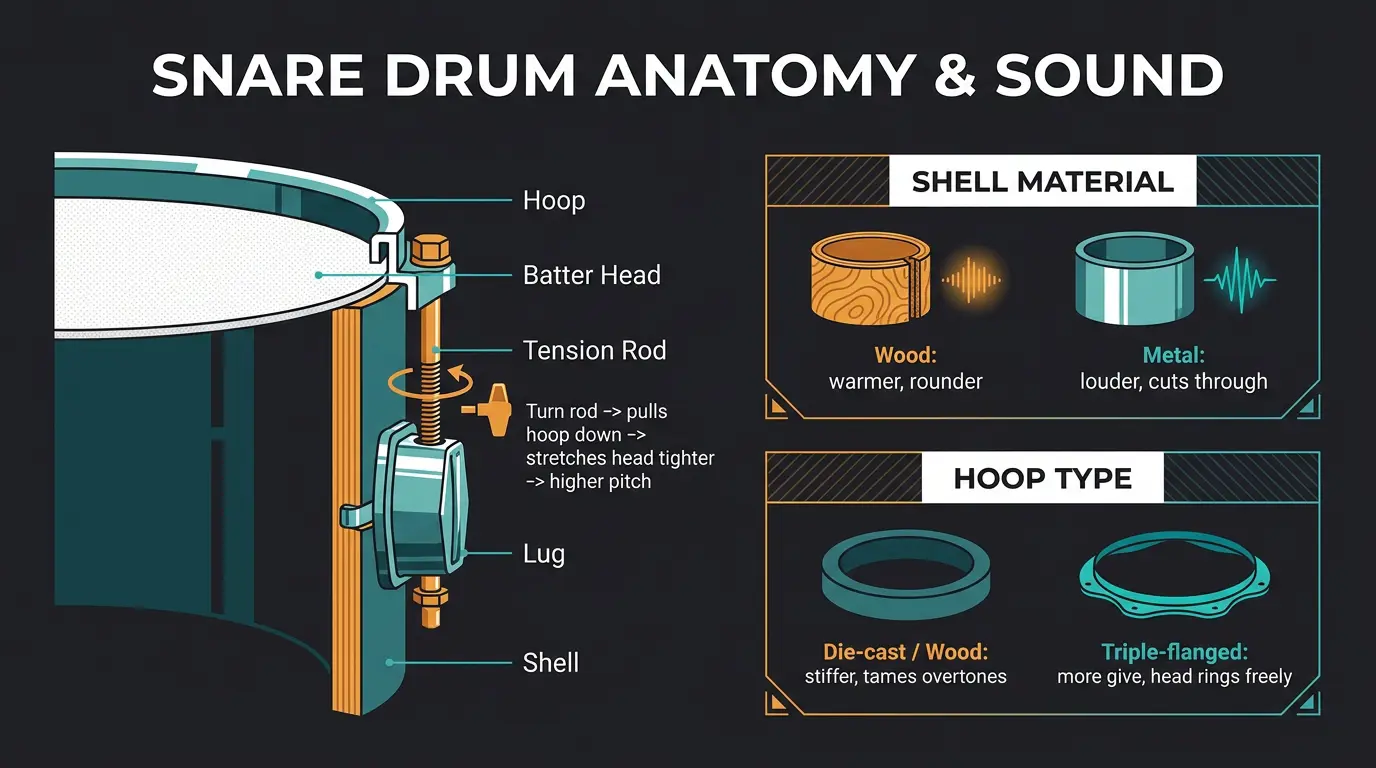
The head rests on the shell. The hoop seats over the head, and the tension rods pass through the hoop and thread into the lugs bolted to the shell. When you turn a rod with a drum key, you pull the hoop down and stretch the head tighter. Tighter head, higher pitch. That's it.
What's under your hands changes the tone, though. Wood shells are warmer and rounder; metal shells are usually louder and cut through a band harder. The hoop matters too. Die-cast and wood hoops are stiffer and tend to tame overtones, while triple-flanged hoops have more give and let the head ring more freely.
None of this is magic. It's just tension, materials, and your ears working together.
Check your heads before you touch a drum key
Before you tune anything, look at your heads. Worn, dented, or lifeless heads won't hold a tune, and no amount of key-turning fixes that. Honestly, replacing dead heads is the single most impactful thing you can do for your snare sound.
Single-ply heads are more open and resonant. Double-ply heads focus the tone for something fatter and shorter. Which one's "right" depends on you and the drum, but here's a rough map of current favorites:
- Remo Ambassador Coated — the classic. Single-ply, bright and open with plenty of sustain.
- Evans UV1 — single-ply with a durable coating, a little more controlled.
- Aquarian Texture Coated — warm and even, a solid all-rounder.
- Evans Genera HD Dry — vented for a drier, punchier, tighter sound.
As a general feel, Remo heads run more open and Evans run tighter, but that's a tendency, not a law. It's personal. Make sure you actually try a couple before you commit to a "forever" head. Change your batter head every six months to a year with regular play, and the resonant head every second or third batter change.
The step-by-step tuning process
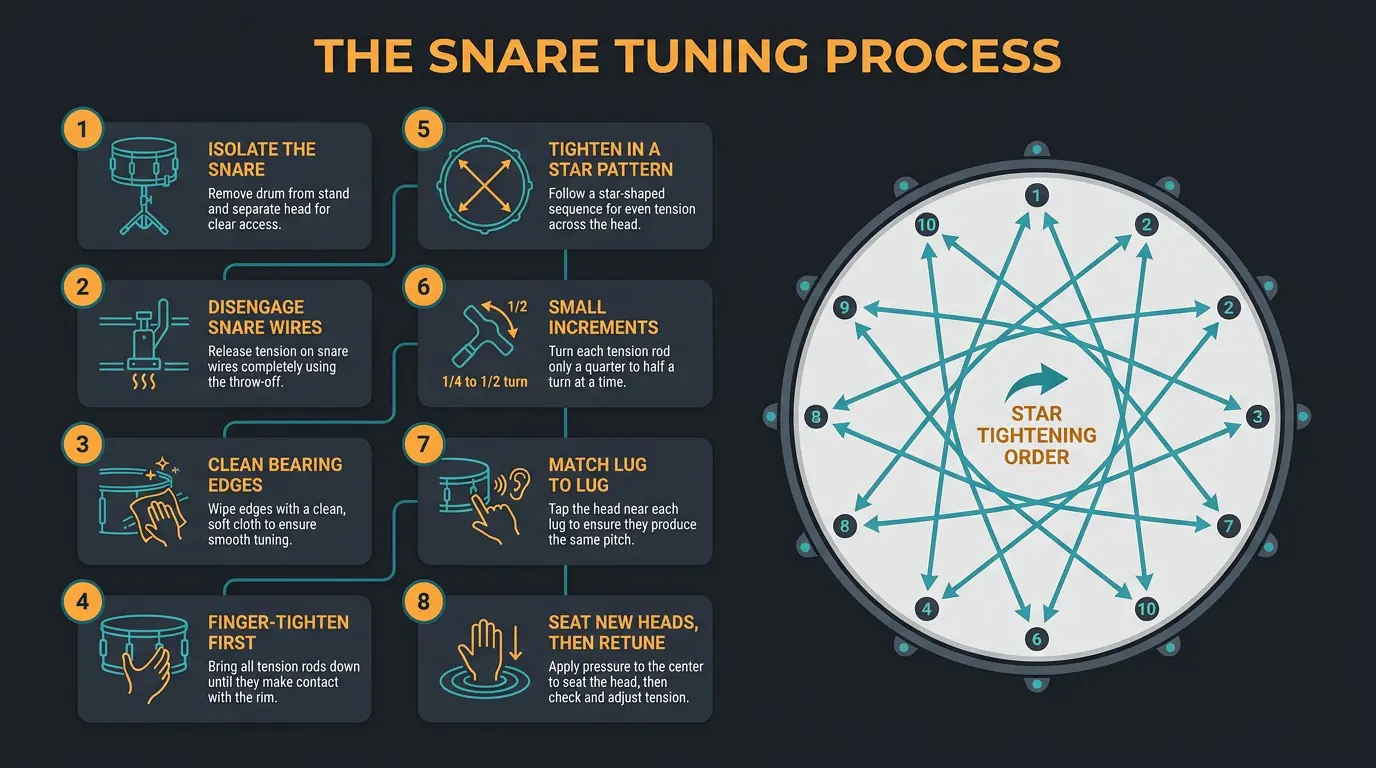
Here's the order that keeps things clean and repeatable:
- Isolate the snare. Move it off the kit or onto a stand by itself. Toms and cymbals ring sympathetically, and you want to hear the snare, not the room's opinion of it.
- Disengage the snare wires. Flip the throw-off so the wires drop off the bottom head. That gives you a clean read while you tune.
- Clean the bearing edges. If you're changing heads, wipe the edges with a soft cloth. Dust and grit mess with how the head seats.
- Finger-tighten first. Set the head and hoop, then run each rod down by hand until it just catches.
- Tighten in a star pattern. With the key, go crisscross — across the drum, not around it — so tension stays even. Most snares have ten lugs.
- Small increments. Quarter to half a turn at a time. Sneak up on the pitch; don't crank it.
- Match lug to lug. Tap about an inch in from each rod with a finger or stick and listen. If one sings higher or lower than its neighbors, nudge it into line. The goal is the same pitch at every lug.
- Seat new heads. Press firmly in the center with your palm. You'll hear a crinkle as the head stretches. Tension will drop after that, so retune.
This is where I'd normally say let's give it a listen and play you the before and after. On the page you can't hear it, so do the work at your own drum. There isn't one correct pitch here — there's the one that sounds right to you.
Getting the batter and resonant heads to work together
The two heads set the character together, and there are two common approaches. Neither is the "pro" way — they're both used constantly.
The first is tuning the resonant (bottom) head higher than the batter, often by about one to three semitones. That gives you more snap and sensitivity, which is why it's the go-to for a lot of players.
The second is tuning the batter slightly lower than the snare side for a rounder, all-round sound. Some folks aim for a pleasing interval between the two heads, like a third or a fifth. Honestly, don't overthink the interval — just listen for a difference that sounds harmonious rather than fighting itself.
The resonant head is very thin and light, so it seats itself without much pressing. And most of your fine-tuning happens on the batter head anyway, since that's the one you hit. Trust your ears here.
Pitch targets and genre
There's no fixed rule, but most snares land somewhere between E3 and B3, with A3 being a common landing spot. That's a starting range, not a target you have to hit.
Genre tendencies exist, and sources genuinely disagree on them, which tells you how loose this is. Rock and metal players often want something tight and focused. Some tune higher to cut through a dense mix; others tune lower so the snare sits heavier. Both work depending on the song.
The real question isn't "high or low." It's whether the snare cuts through the specific mix it's living in. Get it sitting right against the guitars, the vocal, and the kick, and the number on the tuner stops mattering.
Dialing in the snare wires
Once the heads are tuned, flip the throw-off back on and test by hitting the center of the drum. This is the part a lot of guides skip, and it's where a good tuning gets ruined or saved.
If the snare sounds choked and buzzy with a short, strangled sustain, back the throw-off tension off a hair. If the wires sound floppy or don't respond to soft hits, tighten a little. You're aiming for a clear, consistent buzz that follows the drum without smothering the tone.
Make sure the wires are centered on the head so they make even contact across the whole set. Off-center wires give you an uneven, sputtery response no amount of tension will fix.
Don't over-dampen
Here's an opinion that gets people fired up: the obsession with killing every last bit of ring usually backfires. Some even, non-discordant ring is healthy. It's part of what makes a snare sound like a snare.
Live, most of that ring gets swallowed by the rest of the band anyway, even when you're miked. Muffle it into oblivion and the snare goes boxy and dead out front. That's not a better sound, it's just a smaller one.
If you do need to tame an ugly overtone, gels, muffle rings, and a small piece of gaffer tape all work. Reach for the smallest amount that solves the problem. Less is more.
Tools that make tuning repeatable

This is the biggest change since the old days of tuning purely by ear. There are two families of tools, and they solve slightly different problems.
Pitch-based tuners read the actual note or frequency at each lug and can save your tunings. The tune-bot Studio is the hardware standard — it filters out overtones and shows you the exact note per lug. On the app side, Drumtune PRO and iDrumTune Pro do similar work from your phone, with iDrumTune suggesting tuning ranges based on drum size. One heads-up: some older pitch tools top out around 400 to 450 Hz, which can be a problem for very high snare-side heads.
Tension-based gauges measure the tension at each lug instead of pitch. The Tama Tension Watch TW200 and the DrumDial both do this with no batteries or apps. The Tru Tuner is a different animal — it tightens all your lugs at once, which is a real time-saver when changing heads, though it's about speed, not precision.
You'll also see "AI-powered" tuning apps popping up. Treat them as aids, not replacements. My honest take: tune by ear first to get close, then use a device to bring the lugs into tight agreement. The tool sharpens what your ears already found — it doesn't do the listening for you. If you want a second reference, this step-by-step snare tuning guide walks the same territory.
If you're still figuring out the rest of your setup, we've also covered choosing the right drum sticks and controlling your sound with drum shields, both of which play into how your snare actually lands in a room.
Quick snare tuning checklist
- Replace dead, dented, or lifeless heads before you do anything else — a worn head won't hold a tune.
- Isolate the drum and disengage the snare wires while you tune so you get a clean read.
- Work in small quarter- to half-turn increments using a star pattern, and match the pitch at every lug.
- Set the snare wires last, aiming for a clear, consistent buzz that doesn't choke the tone.
- Don't over-dampen — a little even ring is healthy, especially live.
Frequently Asked Questions (FAQs)
What note should a snare drum be tuned to?
Most snares land between E3 and B3, with A3 being a common choice. There's no single correct note, though. The right pitch is the one that cuts through your specific mix or room, so use that range as a starting point and adjust by ear from there.
Should the top or bottom snare head be tighter?
Most players tune the resonant (bottom) head higher than the batter, often by one to three semitones, for more snap and sensitivity. Some prefer the batter slightly lower for a rounder sound. Both work — listen for a pleasing difference between the two heads rather than chasing a rule.
Do I need a drum tuner or can I tune by ear?
You can absolutely tune by ear, and I'd argue you should learn to. A tuner like a tune-bot or DrumDial makes tunings repeatable and helps bring lugs into tight agreement, but it complements your ears, it doesn't replace them. Tune by ear first, then fine-tune with a device.
How often should I change snare drum heads?
Change your batter head every six months to a year with regular play, sooner if you gig heavily, since the snare gets hit most. Resonant heads last longer — swap them every second or third batter change. Worn heads sound dull and won't hold a tune no matter what you do.
Why does my snare buzz too much or sound choked?
Too much buzz usually means the snare wires are too loose or off-center, while a choked, short sound means they're too tight. Re-center the wires and adjust the throw-off tension in small steps. Aim for a clear, consistent buzz that follows the drum without smothering its tone.
Final Thoughts
Tuning a snare is one of those skills that feels mysterious right up until it clicks, and then you wonder why you ever stressed about it. Isolate the drum, seat the heads, work the lugs evenly, dial in the wires, and listen. That's the whole game.
Get close by ear, lean on a tool to lock the lugs in tight, and don't muffle the life out of it. Do that a few times and you'll have a snare you can recall on demand — and honestly, that consistency is the real pro move.
Some of the links within this article are affiliate links. These links are from various companies such as Amazon. This means if you click on any of these links and purchase the item or service, I will receive an affiliate commission. This is at no cost to you and the money gets invested back into Audio Sorcerer LLC.