Audio mastering is the final and most important step in the music production process. It involves enhancing the audio quality of the mix, bringing up the overall level, and giving the song a consistent sound across different playback systems. Mastering is a complex art that requires technical skill, creativity, and attention to detail.
In this blog post, I'll outline a 12-step process for how to master a song that will help you achieve professional-sounding results. We will also go into detail on what mastering is and answer some questions related to it. Whether you are a music producer, audio engineer, or a musician looking to take your music to the next level, these tips will give you the tools you need to master your songs with confidence.
What Does It Mean To Master A Song?
Mastering is the final stage of the audio production journey, where the stereo mix of a song is processed and optimized for distribution on various platforms. The goal of mastering is to enhance the overall sonic quality of the stereo track, ensuring that it sounds consistent and balanced across different playback systems. Mastering will make your song competitive with other commercial releases.
Here are some of the key tasks involved in mastering a song:
EQ and Compression: During mastering, an experienced mastering engineer will use EQ and compression to balance the frequency spectrum and control the dynamic range of the mix. This will ensure that the mix sounds consistent and balanced across different playback devices.
Volume Optimization: One of the main goals of mastering is to ensure that the mix is competitive in terms of volume and perceived loudness with other commercial releases. This involves using various techniques such as limiting, saturation, and harmonic distortion to make the track louder without introducing unwanted artifacts.
Sequencing and spacing: When mastering an album or EP, the tracks are often sequenced and spaced for the best listening experience. This may involve adjusting the spacing between tracks or applying fade-ins and fade-outs to ensure a smooth transition between songs. NOTE: This is more related to releasing music on a CD as opposed to streaming.
Encoding: Once the mastering process is complete, the final master is encoded into a suitable format for distribution on different platforms. This may include formats such as CD, vinyl, digital download, or streaming.
Overall, mastering is an essential stage in the production process of a song, as it ensures that the final mix sounds polished, consistent, and competitive with other commercial releases. A skilled mastering engineer will use a range of tools and techniques to enhance the sonic quality of the mix, while maintaining the integrity of the original creative vision of the artist and producer.
Related Article: What Is Audio Mastering And How Can Your Music Benefit From It?
3 Common Mastering Questions

When learning about mastering music, questions often arise. With it being such an advanced technical process that is to be expected. Here are 3 questions my clients, musicians, and artists often ask me.
1. Does My Song Need To Be Mastered Before I Release It?
While it's not strictly required to have your song mastered before release, it can offer significant benefits and improve the overall quality of your final product. Here are a few reasons why you may want to consider mastering your music:
Enhance sonic quality: Professional mastering can help to balance the frequency spectrum, control the dynamic range, and make the track louder. It will make your song more competitive with other commercial releases.
Optimize for different playback systems: Mastering can also help to optimize your music for different playback systems, such as streaming services, CD, vinyl, or radio. This can ensure that your music sounds its best regardless of where it's being played.
Meet industry standards: Releasing professionally mastered music can help to meet industry standards and expectations. This can make your music more attractive to labels, distributors, and other industry professionals.
2. How Long Does It Take To Master A Song
The amount of time it takes for mastering engineers to complete a song can vary depending on several factors, including the complexity of the mix, the number of revisions required, the experience and skill of the mastering engineer, and the deadline for the project.
Generally, it takes me on average 30-90 minutes to master a clients song. Time is money so you need to be efficient while not sacrificing sound quality. Experience is how you achieve this which we will discuss next.
3. Should You Hire A Professional To Master Your Song?
Learning how to master a song can be challenging, so instead hiring a professional can have many benefits. A professional mastering engineer has the experience, technical knowledge, and specialized equipment needed to optimize the sound of your music. Also, having a professional studio that is acoustically treated makes all the difference.
A professional mastering engineer can also provide an objective perspective on your music, which can be invaluable in helping you achieve the sound you want. They can help you identify any issues with your mix and offer suggestions for improvement.
However, hiring a professional to master your song can be costly, and not all musicians or producers have the budget to do so. It's also worth noting that there are many online mastering services available that can provide high-quality results at a more affordable price.
Ultimately, whether or not to hire a professional to master your song depends on your budget, goals, and personal preferences. If you decide to master your own mixes, then follow our guide below to get the best results!
Check out our mastering services below!
Mastering Pre-Checklist

Before I teach you how to master a song, you need to make sure you have a few items in order first.
Mixing: Make sure that your song has been properly mixed to achieve the desired balance of instruments, vocals, and effects.
Editing: Check for any errors or unwanted sounds in the recording, such as clicks, pops, or hums. Ensure that all tracks are properly trimmed and aligned.
Levels: Avoid clipping or overly compressed tracks. Make sure to leave enough headroom for mastering. A songs peak level should be between -6 and -3 dB.
Stereo Width: Don't apply stereo widening to your mix unless it is to create an effect! Stereo widening plugins can create a plethora of problems including phase issues.
Format: Be aware of the file type, bit depth, and sample rate of the mix. With that in mind, think about the required end product and adjust accordingly.
Environment: Make sure you room is acoustically treated or use headphones with flat-frequency modeling. (ex. Slate Digital VSX)
By addressing these items in preparation for the mastering stage, you will give your song the best chance of success.
What Plugins Should I Use For Mastering?
Here is the list of 9 plugins I use in my current mastering chain. Some of these plugins can be switched out with alternatives, while others are required due to their unique characteristics. I'll discuss them in more detail when we talk about how to master a song.
(* Required)
Related Article: The Best Mastering Plugins And How To Use Them Right
How To Master A Song (12 Steps)
Here is my guide on how to master a song in 12 steps. If you follow these steps correctly, you will see an immense improvement in your masters. Let's look at the first step which is listening analysis.
Listening Analysis (Step 1)
Before you master music, it's important to conduct a thorough song listening analysis. This involves critically listening to the mix and identifying any issues or areas for improvement. Here are some things to consider during a song analysis session:
Frequency balance: Are there any frequencies that are too dominant or weak? Does each instrument have its own space in the frequency spectrum?
Dynamics: Are the levels consistent throughout the song? Is there enough or too much contrast between quiet and loud sections?
Clarity: Do all the instruments within the track sound clear? Are they easy to distinguish from each other within the mix? Is there any muddiness or overlap between them?
Stereo Image: Are the instruments and vocals spread out across the stereo field appropriately? Is there any phasing issues?
Effects: Are the effects appropriate for the song and do they enhance the overall mix?
Reference Tracks: Use a commercially released song, that sounds similar in both style and genre, as a reference track. This will let you know where your mix stands.
By conducting a through song listening analysis, you can identify any issues or areas for improvement. You will want to go back to the mixing stage and correct these issues before continuing along in the mastering process.
Frequency Balancing (Step 2)
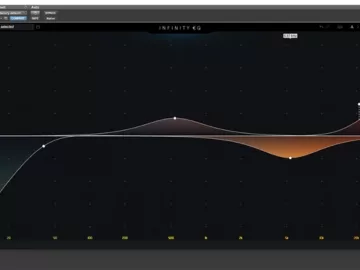
Frequency balancing involves adjusting the levels of different frequency bands in the mix to achieve a balanced and cohesive sound. The goal of frequency balancing is to ensure that the entire mix always sounds clear, balanced, and full, without any frequency ranges overpowering others or sounding muddy.
Though this can be taken care of during the mixing process, it is easier to deal with in mastering. The engineer will typically use a parametric EQ to fine tune the balance and make sure their is an even distribution of frequencies across the spectrum. Some genres require certain frequency bands to be more dominant than others, but that is a conversation for another time.
Recommendation: I use the Slate Digital Infinity EQ for frequency balancing. This EQ allows for extremely tight frequency editing allowing you to dial in the balance in no time.
Add Character With Saturation (Step 3)
Often music made in the digital realm lacks character and that's where saturation come in. Adding saturation to a master will give it the coloration it needs to stand out. The key is to add it subtly and not to over do it.
When it comes to saturation I always reach for the SSL Fusion Vintage Drive. It adds analog warmth, harmonic saturation, and subtle distortion to a track when it is used right. It will also help enhance the perceived loudness of a master.
Tip: If you want to use a preset to get started, I recommend using Sean Divine's "SD Mix Bus". You want to keep the saturation level between 4 and 7 on the meter and I recommend keeping Auto Gain off. With these settings in mind, I usually keep the Mix Knob at 100% wet.
Make That EQ Smile (Step 4)
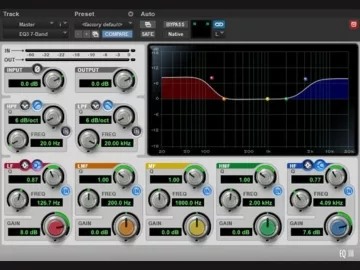
In mastering, it's very common to apply a smiley face EQ even after the frequency balancing process. This means raising the low and high-self bands essentially creating an EQ curve that looks like a smile.
The reason we do this this is because the low and high frequency ranges are what really make a mix shine. By bring out the lows, we can make a song sound more impactful, while bringing out the highs, will add air making the entire track sound more pristine.
When adding this enhancement EQ, I always use the SSL Fusion Violet EQ. This EQ was designed for this task. It has high and low knobs each with settable frequencies. It also has a high-pass filter with a "FAT" button that will increase the frequencies where the filter cuts off.
Tip: It truly depends on the mix, but the following is how I setup this plugin in most scenarios. Set the HPF to 30 Hz, the low frequency to 50 Hz, and the high frequency to 12 kHz. Next, dial in your low and high frequency knobs to taste. Lastly, engage and disengage the "FAT" button to see if it makes a positive difference.
Tame Those High Frequencies (Step 5)
Just like we do on vocal tracks, it's important to tame high frequencies in an overall mix. Sometimes the hi-hats and cymbals can be too much and they need to be compressed. Also, it's not uncommon that there is still vocal sibilance that needs addressed in the mastering phase.
For this process, I keep it in the Fusion family and use the SSL Fusion HF Compressor. This compressor is made for this task and it is simple to use. It only has a threshold, crossover, and mix knob for its main controls.
Tip: Use a crossover frequency of 8 kHz or above. Dial in the threshold so that you are getting occasion gain reduction of no more than 2 dB. If the compression is noticeable, pull back the mix knob.
Make It Wide (Step 6)
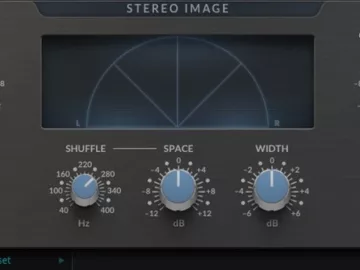
We all want our masters to sound big and wide, and that's where the stereo imaging process comes in. Stereo imaging is a tool that needs to be used correctly or you may add unwanted phase issues to your track. With that being said, if the track you are mastering already has phase issues, then you should skip this step.
For stereo widening, there are many plugins out on the market. I have used many of them but the SSL Fusion Stereo Image has become my favorite. It has a shuffle knob that sets the crossover frequency on the low end. Frequencies below this setting won't be affected by the plugin. The space button boosts and cuts bass frequencies based on the shuffle setting. Lastly, the width knob increases the loudness of the content in the left and right channels.
Tip: I always use the "Subtle Mix Bus Enhancement" preset. I will then dial back the Space and Width knobs congruently if need be.
Analog Transformation (Step 7)
This step is optional, but since the Fusion plugin suite has this available why not utilize it. The SSL Fusion Transformer plugin emulates the 600-ohm, 1:1-wound under-damped transformer found in the Fusion hardware. The SHINE knob is used to attenuate the HF phase shift and the AMOUNT knob will increase harmonic distortion.
Tip: This plugin you pretty much have to dial in to taste. A good preset to use is Sean Divine's "SD Finalizer". With this plugin I recommend using the mix knob.
Chop Off Those Transients (Step 8)
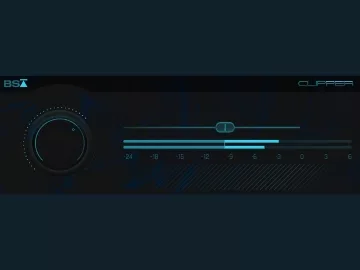
Clipping is a technique that can be used during the mastering process to control the dynamic range of a mix and add a sense of saturation and warmth to the sound. Its main purpose is to make the mix louder in a transparent way.
When an audio signal is clipped, it means that the peaks of the waveform are clipped off or "cut off" at a certain level. This usually happens to the loudest instruments in a mix like the snare drum. But, don't worry, just because the sound gets clipped doesn't mean it disappears.
By clipping the peaks of the waveform, the overall level of the mix can be increased without causing distortion on playback devices. This can help to create a louder, more impactful master that stands up to the competition.
Tip: My favorite clipping plugin is the Black Salt Audio Clipper. What I do is set the output level to -3 dB and then increase the input gain until I get 2 to 3 dB of clipping. The clipping should only happen periodically and not constantly.
Related Article: Black Salt Audio Clipper Review: How To Get Loud Masters
Inflate The Sound (Step 9)
There is no other plugin out on the market that can do what the Sonnox Oxford Inflator can. The plugin does exactly what it says, it inflates the mix. Nobody knows completely what it does behind the scenes, but through testing it looks to increase relevant harmonics to make the overall track sound louder and bigger. The magic is in the mystery.
Tip: With the clipper keeping everything below -3 dB, we want to increase the input level of the Inflator to 2.9 dB. We then want to set the output level to -2 dB to give us headroom for our final plugin. Lastly, increase the effect to taste.
Finalize It With Izotope Ozone 10 (Step 10)
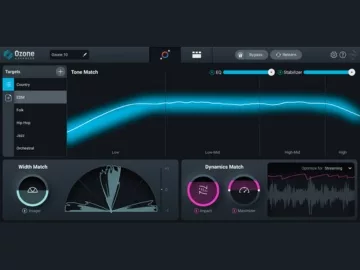
There is a lot to be said about the Izotope Ozone 10 mastering suite. In my opinion, it is the best set of mastering tools available today. Version 10 added several modules that I constantly use in my mastering chain. Below is a step-by-step guide on how to use this plugin in conjunction with what we already did.
Izotope Ozone 10 Mastering Steps
Run the AI algorithm and let it do its thing.
Pull back the amount fader on the EQ to taste. (Note: It normally over does it)
Check the Imager to see what it did. In version 10, it fixes phase issues for you. I usually recommend shrinking the bottom band which the AI usually does.
I usually leave the Stabilizer, Impact, and Dynamic EQ modules set based on the AI, however you can pull back the amount faders and adjust bands on the EQ if need be.
For the Maximizer module, make sure True Peak is turned on and that the ceiling is set to -1.0 dB. Pull down the threshold until you get up to 4 dB of gain reduction.
Constructive Listening (Step 11)
Now that your song sounds good in the studio, it's time to go test it on as many playback devices as possible. These devices should include headphones, AirPods, car stereos, different studio monitors, and even laptop speakers. You want to make sure that the song translates accurately between these devices.
When doing constructive listening, you need to be aware of the capabilities of the devices you are using for playback. For example, laptop speakers aren't going to replicate low-end well. With that being said, you want to make sure you can still hear the kick and bass. For kick, if your mix was done well, you should still hear the low-mids and the click of the beater. For bass, you should hear the low-mids and mids which are the more pronounced notes of the bass.
It is also important to make sure that no frequency range pops out in a negative way. For example, always pay attention to the 3 kHz to 5 kHz range, as these frequencies are where the listener can become fatigued. For the lows and low-mids, make sure your master doesn't sound too boomy or muddy.
If you can get your mastered track to sound acceptable between all the different playbacks out there, then you know you did it right!
Export Your Masterpiece (Step 12)
Now that your song is done, it is time to get it out of your daw so that the world can hear it. The question is, what sample rate and bit depth do I export it to? The answer to this question isn't black and white.
For releasing music for streaming through a distributor like Distrokid, you want to use a sample rate of 44.1 kHz. That is a safe bet. For the bit depth, you can do 24 bit unless you want to release it on CD. For CD, you want to do 16 bit.
If you are going to be using your music in film, video, or YouTube, then using a sample rate of 48 kHz is ideal. Now, if you recorded your music at 44.1, then that is what you are going to export it at. There is no point in sampling upward.
Important! If you are sampling down, make sure to use dither.
Now that you've completed this final step, you are done!
Related Article: Audio Dithering: Why It's More Than Just Adding Noise
Final Thoughts
Mastering your own song can seem like a daunting task, but by following a structured process and using the right tools and techniques, it's possible to achieve great results.
In this blog post, we've outlined a 12-step process for how to master a song, covering everything from preparing the mix to encoding the final master. By following these steps, you can ensure that your music sounds polished, consistent, and competitive with other commercial releases.
Remember, mastering is a crucial part of the music production process, and investing in professional mastering can help to enhance the sonic quality of your music and make it stand out from the crowd. With these tips and tools in hand, you'll be well on your way to mastering your next hit song.
"Some of the links within this article are affiliate links. These links are from various companies such as Amazon. This means if you click on any of these links and purchase the item or service, I will receive an affiliate commission. This is at no cost to you and the money gets invested back into Audio Sorcerer LLC."