Making a song is a sequence of stages: writing, arranging, recording, editing, mixing, mastering, and then exporting for release. The order matters. Jumping ahead usually wrecks your progress and slows the finish.
Now, in real life these stages overlap. You'll write and arrange at the same time, or edit while you mix. That's fine. But knowing the proper order keeps you from painting yourself into a corner.
This is the production-side walkthrough — turning an idea or an emotion into something other people can actually connect with. For the songwriting craft itself, this is the companion to our guide to song structure and writing. Here, we're focused on the build.
TABLE OF CONTENTS
Start with the song itself
Everything downstream rests on the song. So the first job is capturing ideas before they slip away. A phone voice memo works — don't wait until you're at the computer with the right gear. Grab the idea first, polish later.
Here's the acid test. Strip the production away and play the song with one instrument and a vocal. Does it still hold up? If it does, you've got something worth producing. If it doesn't, no amount of mixing magic will save it.
The composition stage is where you generate the melodic, harmonic, and rhythmic ideas, and those choices define your genre and vibe. If you want to test arrangements before you commit, build a quick pre-production demo. It lets you try different instrumentation without locking yourself in.
Arranging: turning a loop into a song

Arrangement is laying your ideas out along a timeline to build a finished piece. It's where you assemble the structure — intro, verses, choruses, bridge, breakdowns, outro — and add or subtract elements to build and release tension. The goal is simple to say and hard to do: catch the listener's attention, hold it, and make them feel something.
The litmus test is the same idea as before. Map the song out, then play it back without touching your DAW. If you make it through the whole thing without losing interest, you're in good shape. This is the moment a loop stops being a loop and starts sounding like a song.
If arranging isn't your strong suit, here's a practical hack. Drag a professionally made track in a similar style into your session and roughly copy its structure. Note where the energy lifts and drops, listen to how the effects are used, and build your own placeholders from that.
One sequencing tip: do your detailed sound design after the arrangement, not before. If you fall in love with a sound early, it might not survive once everything's in place. Build the skeleton first. And remember — less is more. A part you can take away without hurting the song probably shouldn't be there.
Recording your tracks

If you're recording from scratch, use a click track and build from the foundation up. Start with the drums, then the bass, then build from there. Record the vocals last — they sit on top of everything else, so you want the bed underneath them first.
Even in a mostly programmed track, live takes matter. Vocals, guitar, or even a few claps give a character that MIDI can't fake. Not every part needs a live performance, but one or two real takes can change the whole feel.
Recording well beats fixing it later. It's almost always better to do another take than to repair a bad one in the mix. So before you hit record:
- Set your input levels and watch for clipping.
- Pick the right mic for the source.
- Listen to the room — buzzing fridges and loud fans sneak into takes more than you'd think.
Record at 24-bit if you can, and no less than 16-bit. You'll get plenty of headroom either way, which sets you up nicely for the next bit.
Setting your recording levels
Most interfaces and DAWs are happiest with recording levels between -18 and -12 dBFS. Sources vary a little on the exact number, so treat that as a working range rather than a hard rule.
For vocals, do this at soundcheck: have the singer perform their loudest part, then set the preamp gain so the peaks land around -6 to -10 dBFS. That leaves headroom for spikes — and singers always have spikes.
The throughline behind all of it is balance. Make sure you're loud enough to stay above the noise floor, but low enough that nothing distorts. Get that right at the source and the rest of the process gets easier.
Editing: the step most people skip
This is the stage beginners skip, and it's often the difference between an amateur sound and a professional one. It's not glamorous, but the time you put in here pays off everywhere downstream.
One caveat: not every genre wants heavy editing. Jazz, for example, often lives on the looseness of a real performance, and cleaning that up can suck the life out of it. Use your judgment for the style you're working in.
For most music, editing and prep before the mix looks like this:
- Delete tracks you're not using.
- Make your final arrangement tweaks.
- Bounce MIDI tracks to audio.
- Prep your submixes.
Quick terminology note while we're here, because it actually matters. Those grouped instrument buses are submixes — drums, vocals, guitars and so on. Individual recorded parts are multitracks. The word "stems" gets thrown at both, but a stem is a submix. Calling everything a stem just makes hand-off conversations confusing.
Mixing it all together
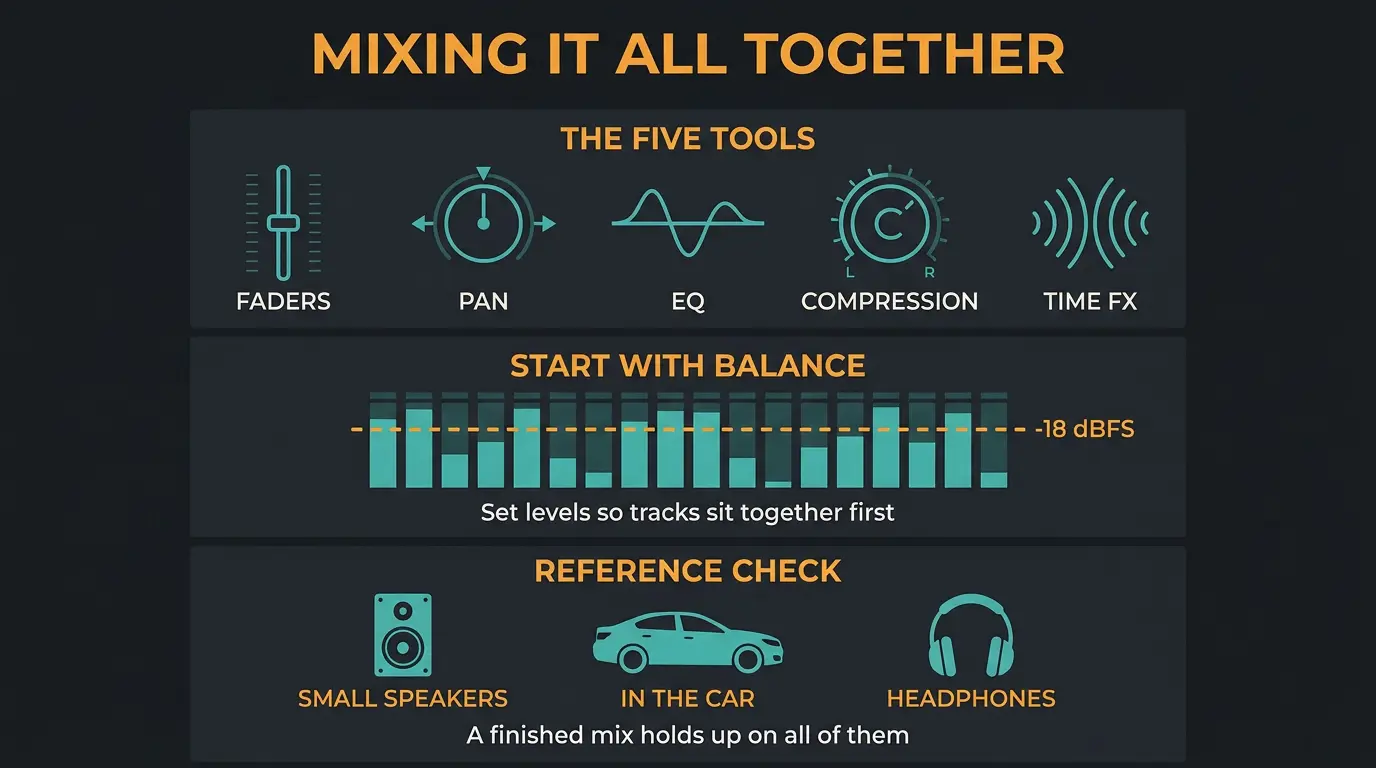
Mixing is combining everything you've recorded into a stereo 2-track that lets you hear all the instruments clearly, with depth and motion. A good mix supports the intention of the song. Your tools are faders, pan, EQ, compression, and time-based effects like reverb and delay.
Start with balance. Even just setting the volume of your tracks so they sit together is mixing — it's the most important move you'll make. A solid starting point is leveling everything to peak around -18 dBFS, then building from there. From choosing the right reverb for depth to carving space with EQ, every later decision is easier on top of a good balance.
Mixing has the biggest single impact on how a song sounds. You can rescue a mediocre recording with a smart mix, or you can ruin a great one with the wrong moves.
Knowing when to stop is a real skill. Endless tweaking makes you deaf to your own mix. Step away, come back with fresh ears, and reference-check on small speakers, in the car, and on headphones. A mix that's actually finished holds up on all of them.
Gain staging and headroom
Here's where numbers help. Aim for peaks around -9 to -10 dBFS at the loudest, with the average hovering around -18 dBFS. That gives you a clean, controlled signal with room to work.
If you're using analog-modeled plugins, this matters even more. Many of them are calibrated so that around -18 dBFS RMS hits the classic gear sweet spot — push past it and you lose the dynamic range those models are trying to recreate. The good news is that modern plugins genuinely deliver, so you don't need a rack of hardware to get there.
Leave headroom on the master bus. Your master should never peak at 0 dBFS before mastering, because the mastering stage needs room to apply EQ, compression, and limiting. The professional convention is a 20 dB headroom margin, which puts your digital operating level around -20 dBFS.
The payoff is real. Mix too hot — say an average around -6 dBFS — and your gear is handling signals roughly 18 dB louder than it was designed for. That's exactly why hot mixes tend to sound hard, brittle, and strained.
Mastering: the final coat of finish
Mastering is the coat of finish. It makes the mix sound balanced, consistent, and polished across every system. Its main job is translation — the track has to sound clean on cheap earbuds, clear in a car, and powerful on club speakers.
Here's the clear distinction: mixing is applied to individual tracks, mastering to the whole song as one. The moves are EQ, compression, limiting, and loudness, all working on that single stereo file.
And about loudness — used right, louder does sound better. The blanket fear of pushing levels is overblown. Match the loudness to your genre and the platform you're releasing on, and don't apologize for it. The goal isn't to crush the life out of the song; it's to give it the right energy for where it'll be heard.
Once it's mastered, you're nearly there. The song still needs exporting and converting to the right format for distribution — and if you're deciding between formats, our breakdown of AAC vs MP3 is worth a read. For a wider view of the whole arc, Waves has a solid overview of the six stages of music production.
The song-making stages at a glance
- Writing: the core song that holds up stripped bare with one instrument and a vocal.
- Arranging: the ideas laid out on a timeline into a real structure that holds attention.
- Recording: clean, well-leveled takes captured at 24-bit with live character where it counts.
- Editing: a tidy, prepped session with submixes ready and dead weight cut.
- Mixing: a balanced stereo 2-track with depth and motion that translates everywhere.
- Mastering: a polished, loud-enough final file that sounds right on any system.
Frequently Asked Questions (FAQs)
How long does it take to make a song?
Anywhere from a few hours to several weeks, depending on the song and your experience. A simple beat can come together in an afternoon, while a fully produced track with live recording, detailed editing, and mastering takes much longer. Don't rush the stages that need fresh ears.
Do you need expensive gear to produce a song?
No, you don't need expensive gear to produce a song. A computer, a DAW, an audio interface, and a decent pair of headphones get you a long way. Modern plugins genuinely rival analog hardware now, so the old "you need real gear" argument doesn't hold up.
What's the difference between mixing and mastering?
Mixing blends your individual tracks into one balanced stereo file; mastering polishes that finished file as a whole. Mixing works on every instrument and vocal separately. Mastering treats the full song as one unit, focused on translation and loudness across every playback system.
Should you write or produce first?
Write first, then produce. The song needs to hold up stripped bare — one instrument and a vocal — before you pour time into production. That said, the stages overlap, and a lot of writing happens while you arrange, so don't treat the line as rigid.
What recording level should you aim for?
Aim to record between -18 and -12 dBFS on most interfaces. For vocals, set your preamp so the loudest part peaks around -6 to -10 dBFS, leaving room for spikes. The goal is staying above the noise floor while keeping enough headroom to avoid distortion.
Final Thoughts
Making a song from start to finish is really just respecting the order: get the song right, arrange it, record it well, edit it honestly, mix it with intention, and master it for the world. Each stage builds on the one before, and shortcuts tend to show up later as problems you have to fix the hard way.
Trust your ears at every step. There isn't always a right or wrong way — there's the way that serves the song. Build it stage by stage, step away when you need to, and you'll be surprised how often the finished track sounds better than the idea you started with.
Some of the links within this article are affiliate links. These links are from various companies such as Amazon. This means if you click on any of these links and purchase the item or service, I will receive an affiliate commission. This is at no cost to you and the money gets invested back into Audio Sorcerer LLC.