Move in close to a directional mic and the bass swells up. That's the proximity effect, sometimes called "bass tip-up," and it's one of those things that can be your best friend or your worst enemy depending on how you use it.
It's why radio voices sound so deep and why a close-miked kick drum booms. It's also why a lot of home vocal recordings turn out muddy. Here's what it actually is, why it happens, which mics do it, and how to keep it under control.
TABLE OF CONTENTS
What the proximity effect actually is
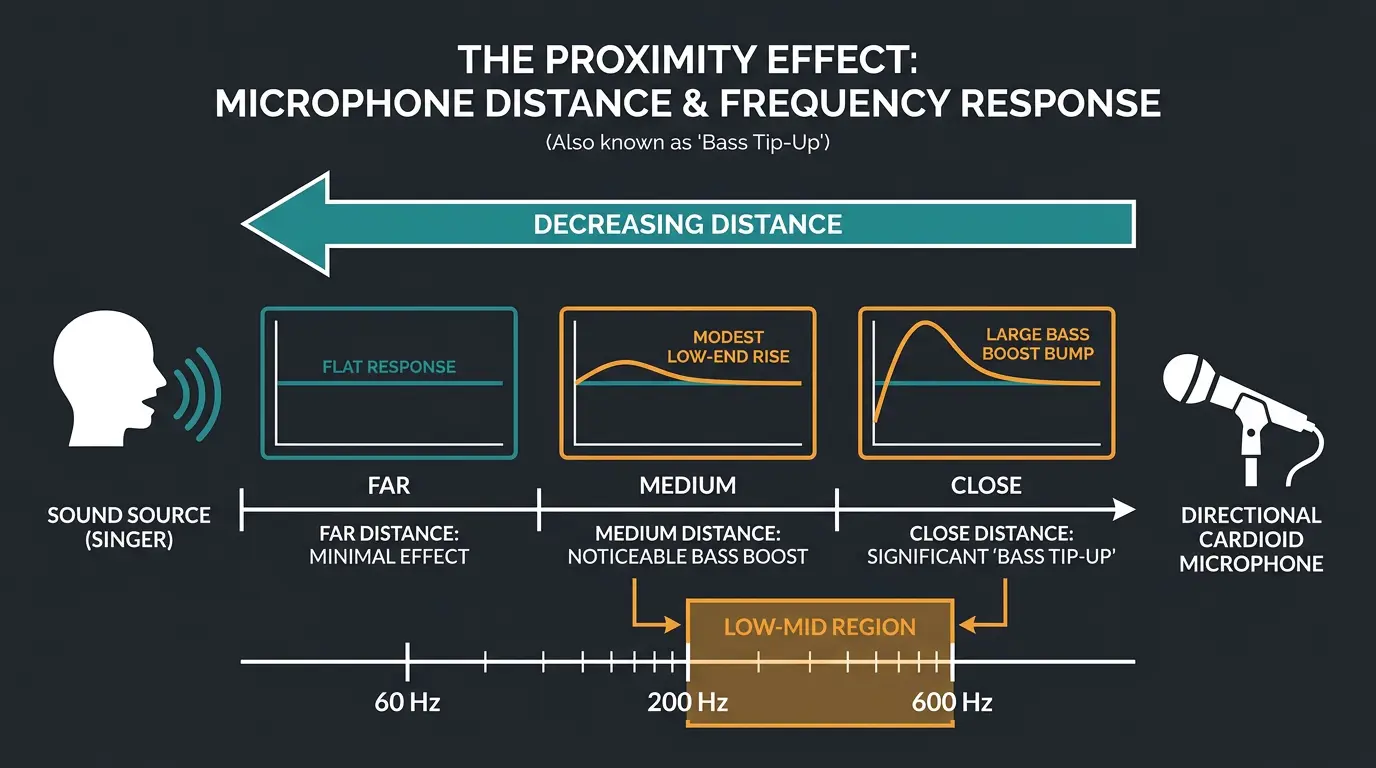
The proximity effect is the increase in a directional mic's low-frequency response as it gets closer to the sound source. The closer you get, the bigger the bass boost. Simple as that.
You'll also hear it called "bass tip-up," which is the same thing described from the other direction. Whatever you call it, the low end climbs as the gap shrinks.
One thing worth knowing early: this isn't only a sub-bass thing. The boost reaches up into the low-mids too, somewhere in the 200 to 600 Hz range depending on the mic. That's part of why a heavy proximity boost can feel thick and cluttered, not just deep.
Why it happens
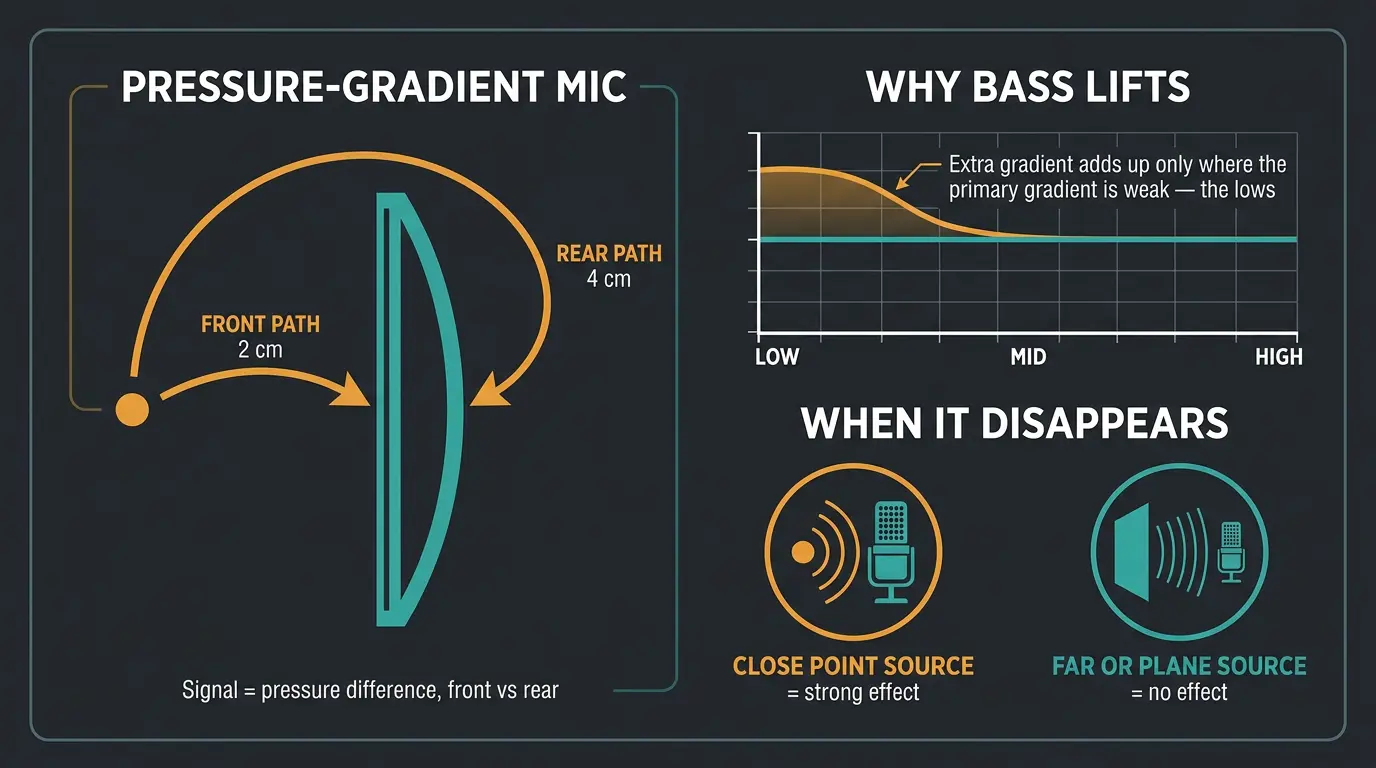
Directional mics are pressure-gradient transducers. Fancy term, simple idea: they make their signal by responding to the difference in pressure between the front and the rear of the diaphragm. Sound reaches both sides, and the mic cares about the gap between them.
Here's the part that causes the bass lift. Say the source sits 2 cm from the front of the diaphragm and 4 cm from the rear. Up close, that rear path is double the front path. For a point source, that difference alone knocks the pressure down by a good chunk from front to back, and that acts like an extra gradient stacked on top of the normal one.
That extra gradient only really matters at low frequencies, because the mic's primary gradient is weak down there to begin with. So the lows get lifted and the highs mostly don't. It also depends on the source acting like a point or a line source. Point a gradient mic at a big flat plane source, or back way off, and the effect basically disappears. If you want the deeper physics write-up, the proximity effect entry on Wikipedia lays it out well.
Which mics do it, and how much
Here's where a lot of quick explanations get it wrong. It's not just "cardioid and supercardioid." The proximity effect exists on every gradient mic, and the amount scales with how directional the pattern is.
Picture the range from wide cardioid to cardioid to super and hypercardioid, all the way out to figure-8. The closer the pattern leans toward figure-8, the stronger the proximity effect gets. A cardioid, for what it's worth, is really a 50:50 blend of a pressure mic and a pressure-gradient mic, so it lands in the middle.
A few things follow from that:
- Omnis don't do it at all. The rear of the diaphragm is sealed in a fixed-pressure chamber, so there's no gradient to lift.
- Ribbon mics do it strongly. They're inherently figure-8, so they show a big boost up close. If you're curious about those, we cover them in our guide to the best ribbon microphones for studio recording.
- Multipattern condensers are a bit of a wildcard. Since each half of the dual-diaphragm capsule is cardioid, some folks argue you'll get a noticeable proximity boost no matter which pattern you dial in.
You'll sometimes see the old "up to 16 dB" number thrown around. That undersells it for the strongly directional mics. At about 5 cm, a figure-8 can push more than 20 dB of boost at 100 Hz. The real number depends on the pattern and the distance, not a single fixed figure. If polar patterns are new to you, our breakdown of microphone polar patterns and how to use them is a good companion read.
At what distance it kicks in
With a pure gradient mic, the proximity effect starts becoming noticeable around a meter from a point source, and it climbs steadily as you close the gap. Work at roughly 60 cm or closer and you're getting a real, hearable boost.
Go the other way and it fades out. Beyond about a meter, or with a plane source instead of a point source, there's practically none of it. Don't treat these as hard lines in the sand. The better mental model is a dial: closer means more, farther means less, and somewhere past a meter it quietly bottoms out.
Using it on purpose
The proximity effect isn't a flaw to always fight. It's a tool. A singer can get a deep, earthy tone by leaning right in, then open the sound up by backing off and singing a little louder. That's "working the mic," and it takes real practice to do smoothly.
It's the same trick behind those buttery radio voices, and it's why a close-miked kick drum comes back so boomy. Used with intent, it's a free way to add weight.
It shines on low-end sources especially. Kick drum, upright and electric bass, a baritone or bass vocal — the proximity effect naturally fattens them without you touching an EQ. Free low end, no extra plugins. You could say it really brings out their better sides.
When it becomes a problem
The flip side is real. Too much low end muddies a vocal and chews up speech clarity, which matters a lot for spoken word and podcasts. Once your "fattened" vocals and guitars pile up down low, they start fighting the bass and kick for the same space.
It compounds, too. In a big tracking session with a dozen or more close directional mics, every one of them is building up the same region. Do that across a whole kit and a full band and the low-mids turn into soup fast. None of it is a dealbreaker — you just have to be aware it's happening and manage it.
How to control it
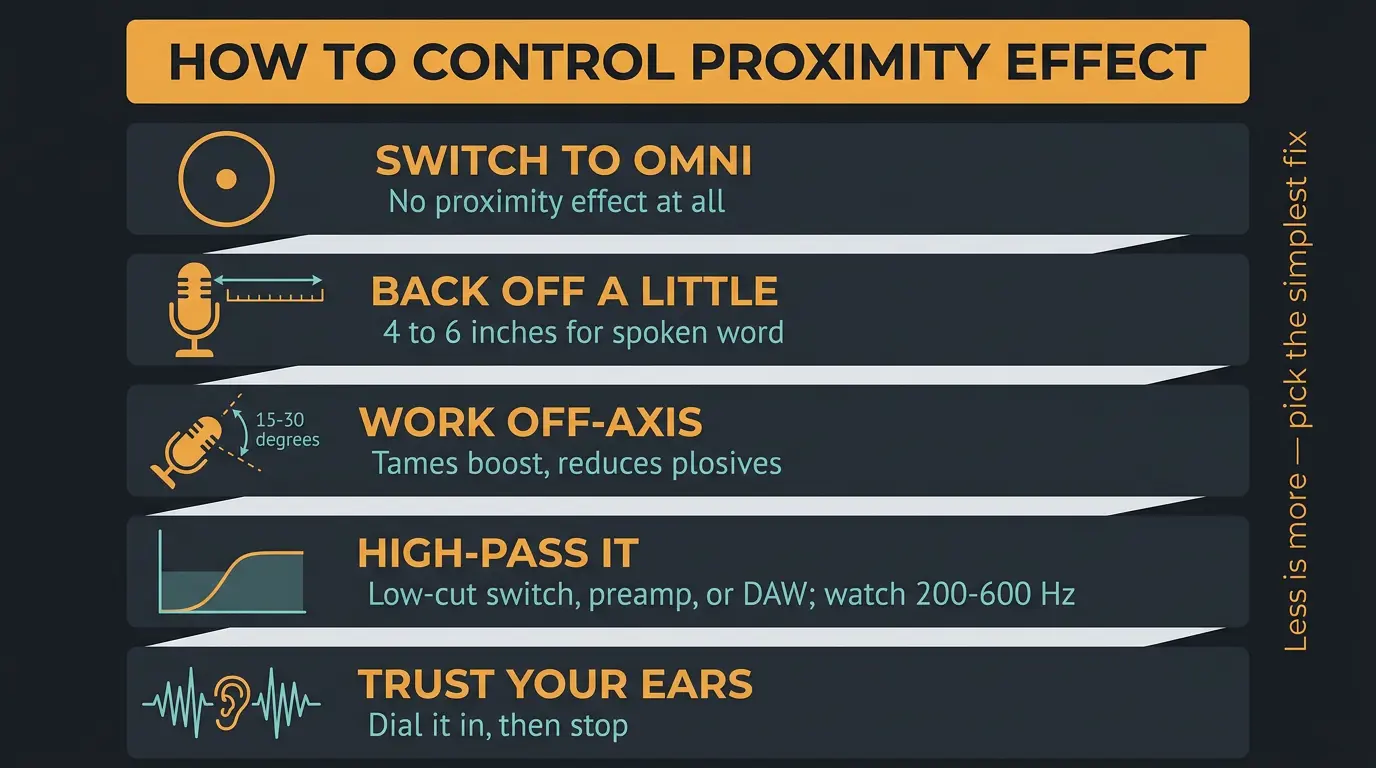
Good news: you've got plenty of ways to tame it. Less is more here, so reach for the simplest fix that gets the job done.
- Switch to an omni. Omnidirectional mics don't have proximity effect at all, so if you want it gone entirely, that's the cleanest route.
- Back off a little. Pick a working distance instead of eating the mic. For spoken word, 4 to 6 inches is a solid starting point — warm and present without going boomy.
- Work off-axis. The effect is strongest dead on-axis. A slight 15 to 30 degree offset tames the boost and helps with plosives at the same time. A pop filter pairs nicely with that.
- High-pass it. Use the mic's own low-cut switch, a filter on your preamp or interface, or one in your DAW. Just remember a high-pass cleans up the very lows, but you may still have some buildup in that 200 to 600 Hz range to deal with. Some mics, like the AKG C414, even offer a dedicated, gentler proximity filter separate from a plain rumble cut.
Whatever you pick, trust your ears. There isn't one right answer here — dial it in until the source sounds like it should and stop there.
Quick things to remember
- Only directional (gradient) mics have proximity effect — omnis don't do it at all.
- It gets stronger the closer the polar pattern leans toward figure-8, so ribbons show it hard.
- It starts around a meter out and climbs steadily as you get closer; past a meter it basically vanishes.
- Control it with distance, a slight off-axis angle, or a high-pass filter — and trust your ears.
Frequently Asked Questions (FAQs)
Do omnidirectional mics have proximity effect?
No, omnidirectional mics don't have proximity effect at all. The rear of an omni's diaphragm is sealed inside a fixed-pressure chamber, so there's no front-to-rear gradient to lift the lows. If you want to sidestep proximity boost entirely, an omni is the easiest way to do it.
Does a high-pass filter fully fix the proximity effect?
Not completely. A high-pass filter cleans up the very low frequencies nicely, but the proximity boost also reaches into the 200 to 600 Hz range, which a high-pass won't touch. You'll often need a little EQ up there too. Set it by ear rather than by numbers.
Which mics have the strongest proximity effect?
Figure-8 mics have the strongest proximity effect, and ribbon mics fall in that camp since they're inherently bidirectional. The more a mic's polar pattern leans toward figure-8, the bigger the low-end boost up close. Cardioids show a moderate amount, and omnis show none.
What's a good distance for recording vocals?
For spoken word, 4 to 6 inches is a reliable starting point — warm and present without turning boomy. For sung vocals it varies with the singer and the mic, so treat it as a dial: closer for weight, farther to open things up. Move around and listen.
Can I use the proximity effect on purpose?
Absolutely, and plenty of pros do. Leaning close adds a deep, earthy weight to a voice or a low-end instrument for free, no EQ required. Singers "work the mic" by moving in and out to shape their tone. Just watch that the buildup doesn't clash with your bass and kick.
Final Thoughts
The proximity effect isn't magic and it isn't a problem you have to fear. It's just physics doing its thing — get close to a directional mic and the low end climbs. Once you know that, you get to decide whether you want it or not.
So use it when a source needs weight, tame it when things get muddy, and lean on distance, angle, and a high-pass to steer it. Let's give it a listen the next time you set up a mic, move around a bit, and let your ears make the call.
Some of the links within this article are affiliate links. These links are from various companies such as Amazon. This means if you click on any of these links and purchase the item or service, I will receive an affiliate commission. This is at no cost to you and the money gets invested back into Audio Sorcerer LLC.