Gain staging is just managing your levels through the whole signal chain, so nothing clips, nothing hisses, and your plugins behave the way they were designed to. That's the entire job. Keep the signal sitting in a sensible spot at every point from the mic to the master.
Here's the thing though — a lot has changed since most of us learned this. 32-bit float, streaming loudness normalization, true peak metering. And with all that change came a pile of confident-but-wrong advice, mostly on forums. So let's walk it cleanly, mic to master, with real numbers and no myths.
TABLE OF CONTENTS
What gain staging actually is
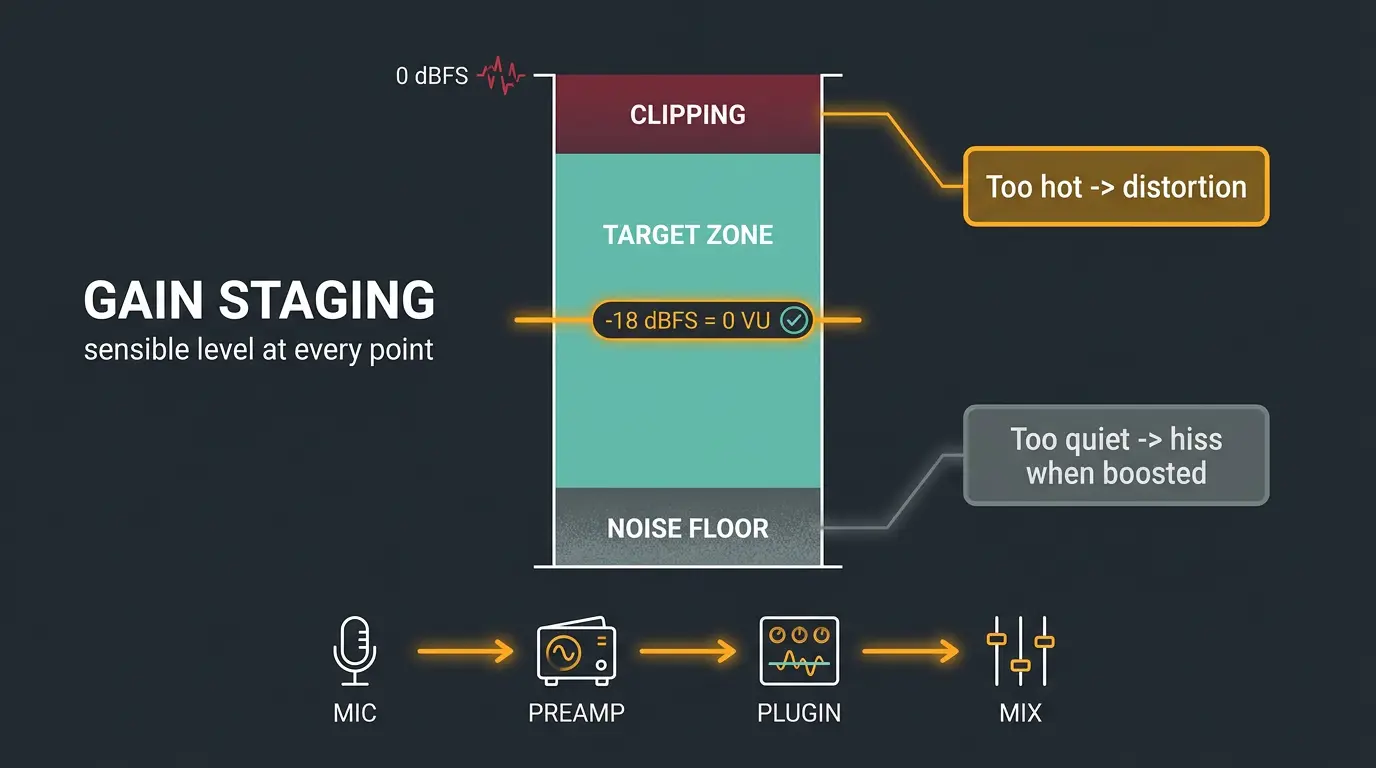
Gain staging means keeping your signal at a sensible level at every point in the chain — not too hot, not too quiet. That's it.
There are two enemies. At the top, clipping: push too hard and the signal runs out of room and distorts. At the bottom, the noise floor: record or run too quiet and you drag up hiss when you turn things back up. The goal is landing comfortably in between.
You'll see -18 dBFS thrown around as the reference, and there's a reason. Most analog-modeled plugins — your EQs, compressors, tape and saturation emulations — are calibrated internally around -18 dBFS standing in for 0 VU on the original hardware. Feed them near that level and they behave like the gear they're imitating.
The targets, from mic to master
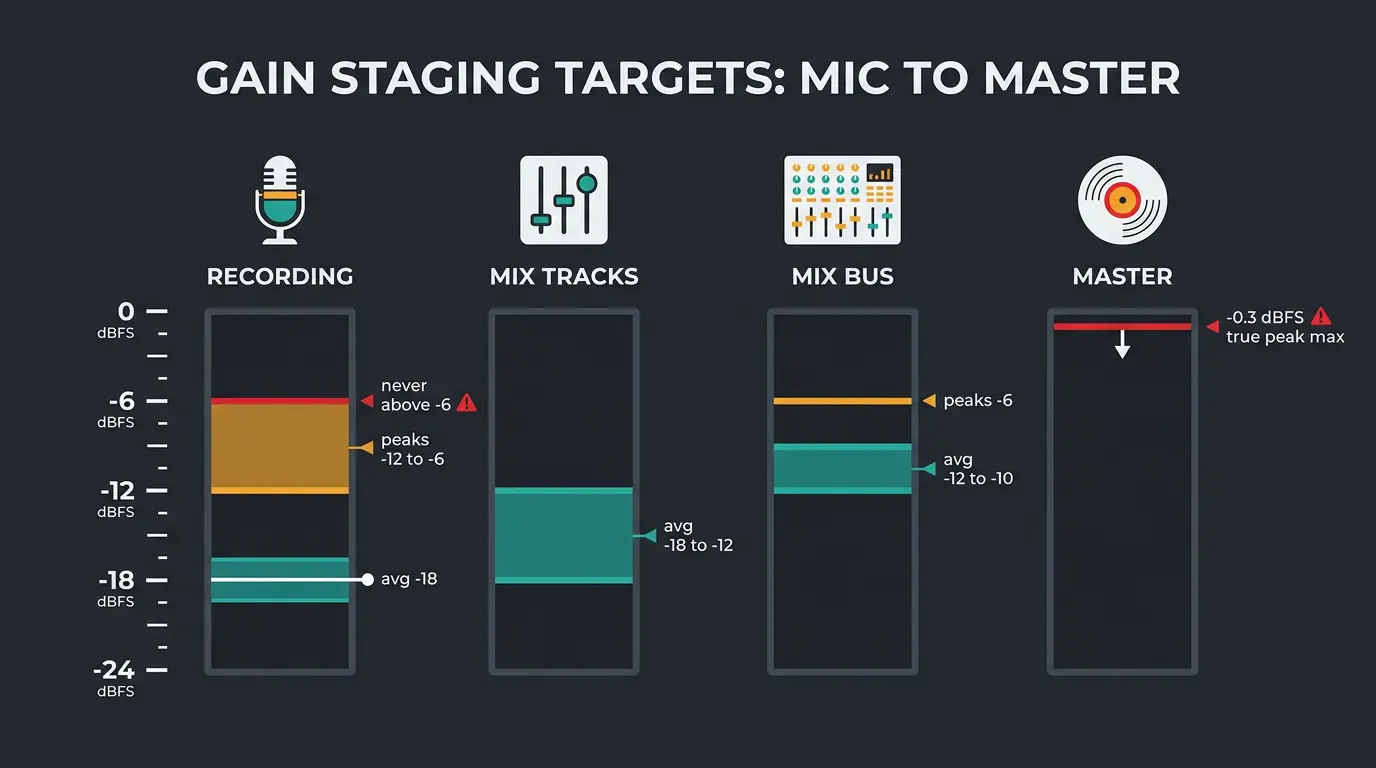
Let's put real numbers on this. When you're recording, aim for peaks around -10 dBFS and an average near -18. Never let it go above -6. That gives you room to work and keeps the noise floor down.
Now the correction most people need to hear. That -18 dBFS figure is an average target, not a peak target. If you set a snare so its peaks hit -18, you've recorded a very quiet snare. Let the peaks land where the source's natural crest factor puts them — usually somewhere between -12 and -6 — while the average sits around -18.
For individual tracks in the mix, average -18 to -12 dBFS is the pocket. On the mix bus, aim for peaks around -6 dBFS and an average of -12 to -10, which leaves headroom for mastering. And make sure you keep the final master below -0.3 dBFS true peak — more on true peak in a bit.
Quick target cheat sheet
- Recording: average around -18 dBFS, peaks around -10, never above -6
- Faders: keep them within ±5 dB of unity and rebalance with clip gain
- Mix bus: peaks around -6 dBFS, average -12 to -10 for mastering headroom
- Master: keep it below -1 dBTP true peak
Is gain staging dead now that we have 32-bit float?
You've probably seen the forum take: gain staging is dead because DAWs run 32-bit float now, so internal clipping is impossible. Blast a track +15 over zero, pull the master down before it hits your speakers, and mathematically you're fine.
And honestly? That part's true. Your DAW's mix engine runs in 32 or 64-bit float with a staggering amount of internal headroom, so the summing bus won't hard-clip no matter how hot things get.
Here's where it falls apart. Plugin architecture still cares deeply about input gain. Analog emulations choke when you overcook them, and compressors overreact. You're not getting the sound the plugin was built to make. And at some point your signal leaves that float environment and hits a finite output stage — a converter, a limiter, an exported file. A 24-bit export that exceeds 0 dBFS bakes that distortion in permanently.
So 32-bit float keeps your DAW from catching fire. It doesn't stop your processors from overcooking. If you want the deeper version, iZotope has a solid write-up on gain staging worth a read.
A note on 32-bit float recording
Field recorders and wireless mics now market 32-bit float capture as "forget the gain knob." There's real magic there — it removes digital clipping risk on the way in. But it doesn't remove physics.
The mic's analog electronics still have hard limits on SPL and voltage, plus an ever-present noise floor. Whisper too close or scream into it and you can still get analog distortion the float format can't undo. So you still need to understand your gear.
A simple workflow that keeps you in the pocket
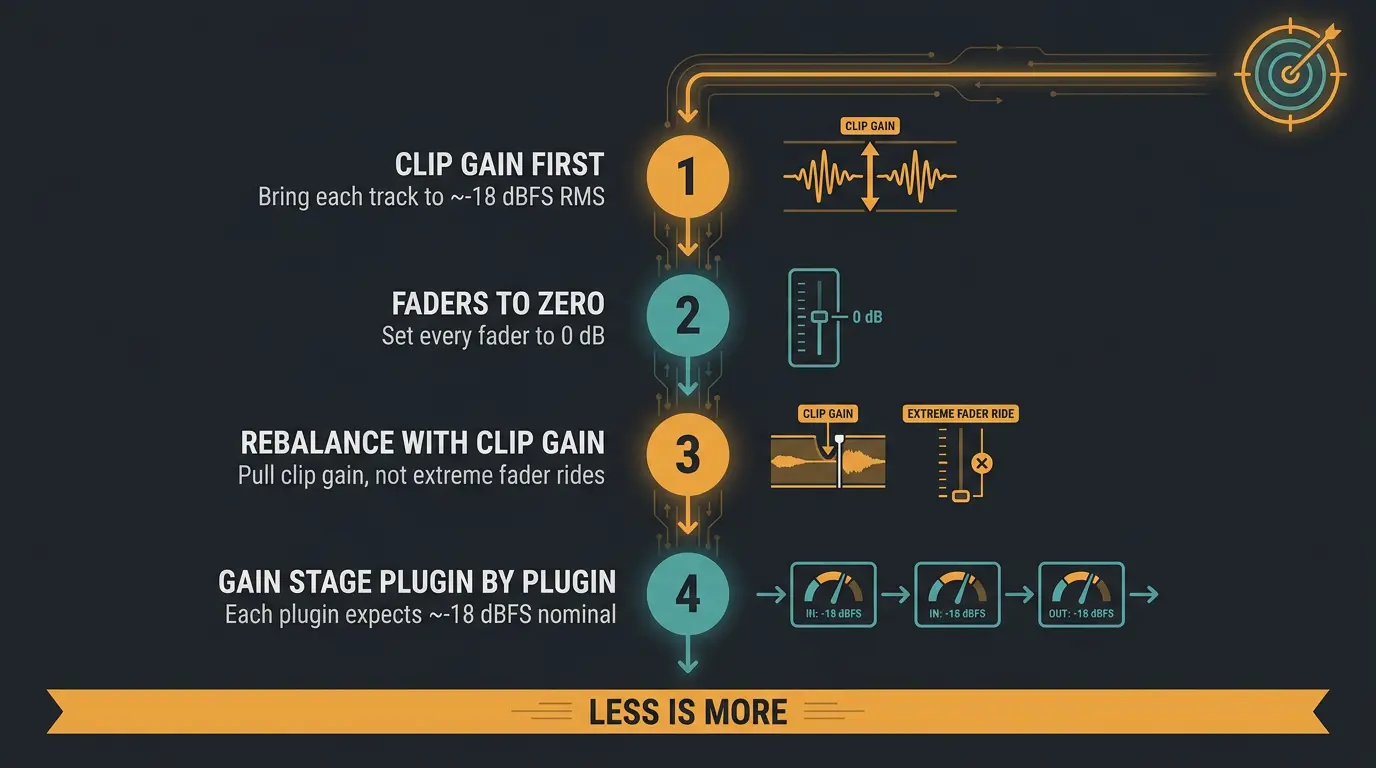
Here's a clean modern workflow that keeps you honest without babysitting meters all day:
- Clip gain first. Before you touch a fader, use clip gain to bring each track's average to around -18 dBFS RMS. If you're fuzzy on averages, our guide to RMS clears it up.
- Faders to zero. Set every channel fader to 0 dB and start your balance from there.
- Rebalance with clip gain, not extreme fader rides. If a part's way too loud, pull the clip gain, not the fader down to -20.
Then go one level deeper: gain stage plugin by plugin, not just track by track. A signal hitting a plugin that expects -18 dBFS nominal behaves differently when it's overcooked. A little attention at each stage beats fixing a crushed sound later. Less is more.
How loudness normalization changes the target
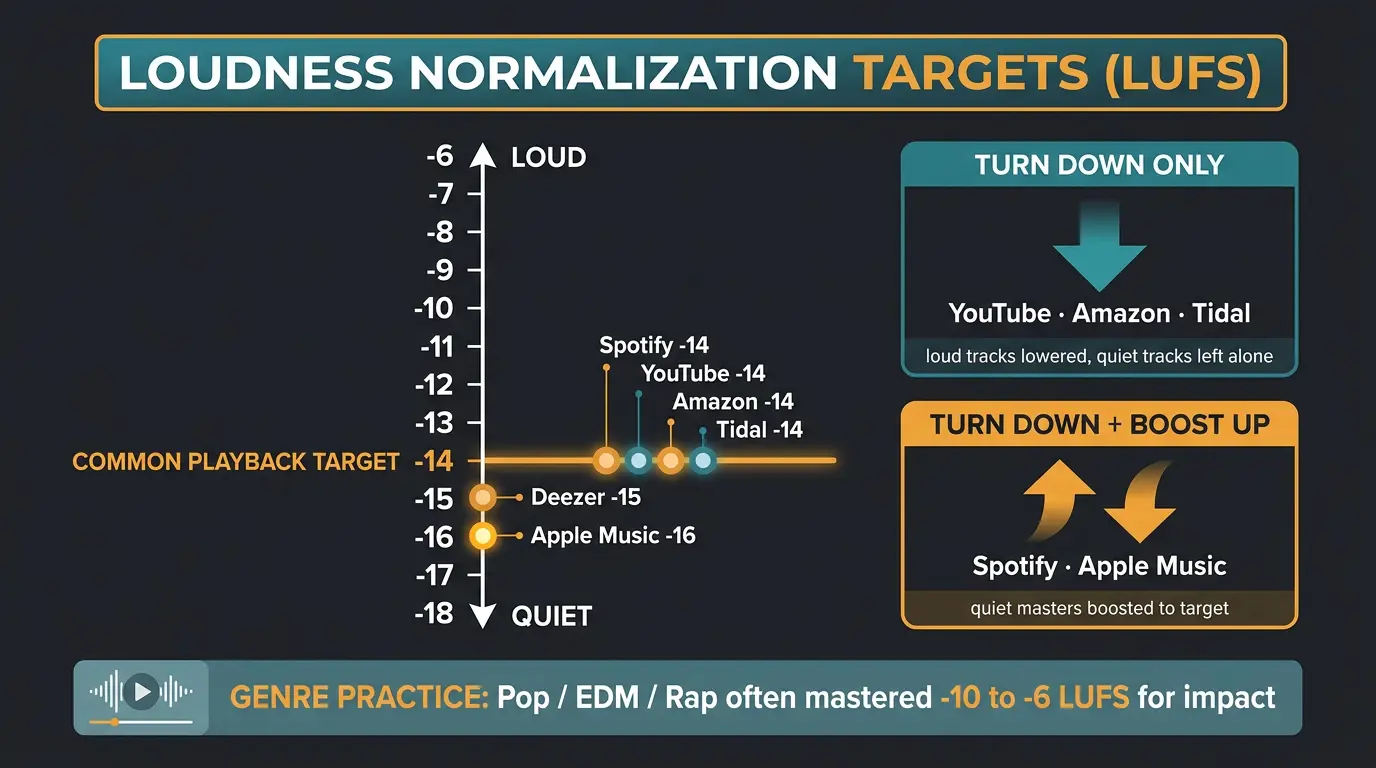
LUFS is how streaming services measure perceived loudness over a whole song, and it's quietly rewritten the headroom conversation. Most platforms normalize playback to around -14 LUFS integrated — Spotify, YouTube, Tidal, Amazon. Deezer sits near -15 and Apple Music around -16.
The behavioral difference matters. YouTube, Amazon and Tidal only turn loud tracks down — they don't boost quiet ones. Spotify and Apple Music will actually boost a quiet master up to their target. So a brickwalled, over-limited master doesn't win the loudness game. It just gets turned down and sounds worse for it.
With that being said, I'm not going to be apologetic here — louder, used right, does sound better, and it's why pop, EDM and rap are still mastered around -10 to -6 LUFS for impact. -14 LUFS is a playback reference, not a hard rule. Master for the song, keep your dynamics in check, and don't crush it just to chase a number.
True peak vs sample peak
A sample peak is what your DAW meter shows — the level of the actual digital samples. True peak, measured in dBTP, estimates the inter-sample peaks that appear when the digital signal gets converted back to analog or transcoded to a lossy codec.
Those two are different numbers. A master reading -0.1 dBFS on a sample meter can still clip a codec once it's turned into AAC or Ogg Vorbis, which is exactly why -1 dBTP exists as a target. Spotify wants you below -1 dBTP, or below -2 dBTP when your track is louder than -14 LUFS integrated.
Plenty of tools read true peak: Youlean Loudness Meter, iZotope Insight, FabFilter Pro-L 2, and the Ozone Maximizer. Make sure you switch on true peak mode on your final limiter so those inter-sample overs get caught before they leave your session.
Frequently Asked Questions (FAQs)
What level should I record at?
Aim for an average around -18 dBFS with peaks near -10 dBFS, and never let it go above -6. The -18 figure is an average target, not a peak target — let the peaks land where the source's natural crest factor puts them so you keep clean headroom and stay off the noise floor.
Does 32-bit float mean I can ignore gain staging?
No. 32-bit float stops your DAW's summing bus from hard-clipping, but your plugins still care about input level — analog emulations choke and compressors overreact when overcooked. And the moment your signal hits a converter, limiter, or exported file, that overcooked level can bake in permanently.
What LUFS should I master to?
There's no single right number — -14 LUFS is a playback reference, not a rule. Master for the song, since pop, EDM, and rap often land louder around -10 to -6 LUFS for impact. Whatever level you choose, keep your true peak below -1 dBTP.
What's the difference between true peak and sample peak?
A sample peak is the level of the actual digital samples your DAW meter shows. True peak (dBTP) estimates the inter-sample peaks that appear when the signal converts to analog or a lossy codec. A master reading -0.1 dBFS on a sample meter can still clip a codec, which is why -1 dBTP is the target.
Should I set faders or clip gain first?
Set clip gain first. Bring each track's average to around -18 dBFS RMS with clip gain, then set all your faders to 0 dB and balance from there. Rebalancing with clip gain instead of extreme fader rides keeps every plugin fed at a level it was designed for.
Final Thoughts
Gain staging isn't dead, and it isn't complicated once you strip away the myths. Keep your averages near -18, let your peaks breathe, feed your plugins the level they want, and watch your true peak on the way out. Do that and the whole chain stays in the pocket.
The numbers here are guideposts, not laws. Trust your ears, master for the song in front of you, and don't crush a mix just to hit a target on a meter. That's the part no plug-in can do for you.
Some of the links within this article are affiliate links. These links are from various companies such as Amazon. This means if you click on any of these links and purchase the item or service, I will receive an affiliate commission. This is at no cost to you and the money gets invested back into Audio Sorcerer LLC.