An AI vocals isolator takes a finished mix, splits it into stems, and hands you the vocal — kept, not deleted. That's the key difference from a vocal remover. A remover throws the voice away so you can sing over the instrumental. An isolator does the opposite: it keeps the voice for you to work with.
Here's the honest part up front. This isn't one magic click. It's a chain of decisions — which model, which settings, which source file — and you'll do some cleanup after. Let's get into what actually moves the needle.
TABLE OF CONTENTS
What an AI vocals isolator actually does
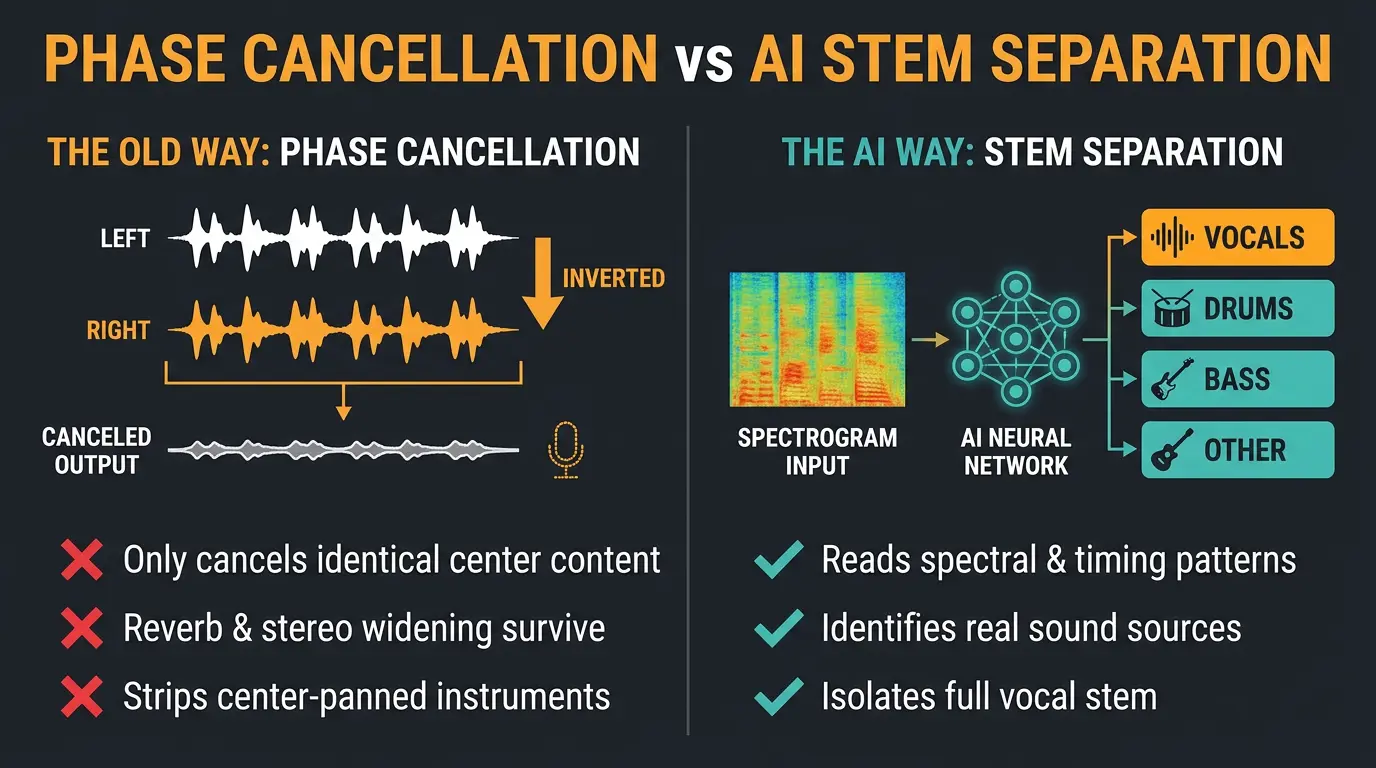
Stem separation splits a finished mix back into its component parts. Quick terminology note while we're here: "stems" really means submixes, and in this case we mean the vocal stem. Instead of hunting for frequencies by hand, you let the AI read the spectral and timing patterns that define each source and pull the voice out.
The old way to isolate vocals from a song was phase cancellation — invert one stereo channel, sum it, and hope. The problem is it only cancels content that's identical in both channels, which in a modern mix with reverb and stereo widening almost never covers the full vocal. You'd end up with something hollow, and it'd strip out your center-panned instruments too.
AI replaced that because it's simply better at identifying and separating real sound sources. If you want the deeper dive on the flip side of this, we covered how AI vocal removers work in a separate post.
Pick the right model for the job
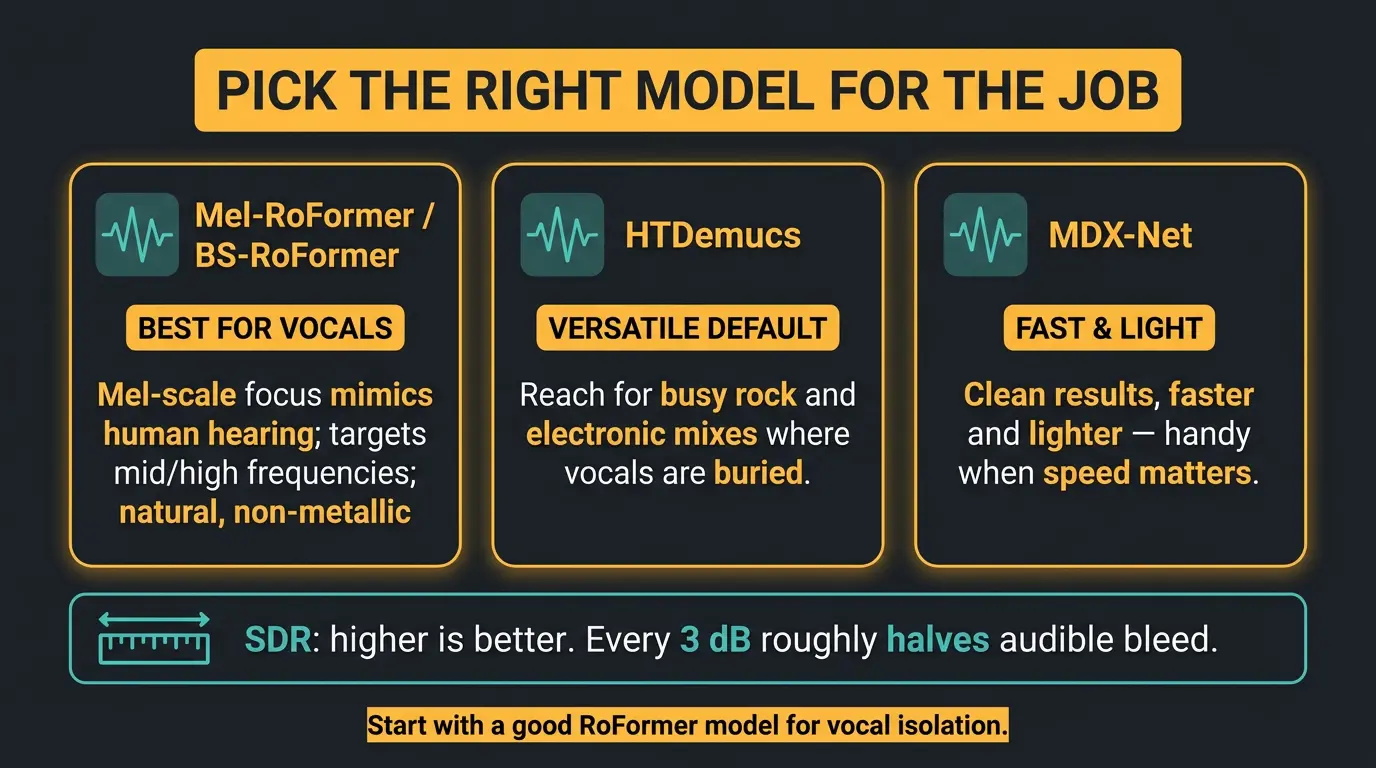
The model doing the separation matters far more than the interface wrapped around it. A few worth knowing:
- Mel-RoFormer / BS-RoFormer — top-tier for vocals specifically. The mel-scale focus mimics human hearing, leaning on the mid and high frequencies where vocals live. That's a big reason it avoids the metallic, robotic sound older tools left behind.
- HTDemucs — the versatile default. It's the one to reach for on busy rock and electronic mixes where the vocal is buried under guitars and synths.
- MDX-Net — clean results, but faster and lighter, which makes it handy when speed matters.
You'll see a number called SDR thrown around with these. Plain version: higher is better, and every 3 dB roughly halves the audible bleed left behind. Don't drown in the numbers — for vocal isolation, a good RoFormer model is where I'd start.
The step-by-step workflow
The basic flow is the same across most tools, web or local:
- Start from your best source. Make sure you feed it a WAV or FLAC over a low-bitrate MP3. Garbage in, garbage out — if the source is muddy, everything downstream stays muddy.
- Upload the file. Drag it into the tool or browse to it.
- Select the vocal/instrumental option. This tells the model you want a clean two-way split.
- Preview the vocal. Give it a listen before you commit. If the vocal already sounds usable, great.
- Export as WAV or FLAC. Lossless, so you've got headroom for editing.
On speed: a cloud tool usually chews through a 3-minute track in about 30 to 90 seconds, depending on the model and server load. HTDemucs runs slower than MDX-Net because it's heavier. Local separation on Apple Silicon is quick — often 20 to 40 seconds for a standard track.
The settings that actually matter
Three levers do most of the work here.
Fewer stems is cleaner. This one surprises people — more stems is not better. A 2-stem vocal/instrumental split beats a 6-stem split for a pure vocal, because every extra stem the model separates at once means more bleed leaking into each one. If you only want the voice, stay in 2-stem mode. Less is more.
Skip eco mode when you care about artifacts. Fast modes skip some preprocessing to speed things up, and the trade is slightly more artifacts. If quality matters, run full quality.
Ensemble mode, for the advanced crowd. Tools like UVR can run several models in parallel and blend the results. Most pro UVR users keep four to six models on hand and mix and match by source. It's more setup, but it's how you squeeze out the cleanest result.
Quick wins for a cleaner isolated vocal
- Start from a lossless source — WAV or FLAC, not a low-bitrate MP3.
- Use 2-stem mode when you only want a pure vocal.
- Skip eco or fast mode when quality matters more than speed.
- Don't re-split a stem that's already been separated — work from the original mix.
What separates cleanly and what fights you
Some material comes out near-usable straight away. Sparse, well-recorded tracks with distinct timbres are the friendly ones — a solo vocal, acoustic folk, clean modern pop. The model has seen thousands of those spectral shapes in training, so it knows what it's looking at.
Dense, layered mixes fight back. We ran a busy electronic track through four different tools, and every single one left kick drum transients bleeding into the vocal around -18 dBFS. Even at 9 dB SDR, you'll hear a ghost of that kick sitting under the voice.
That's not a knock on the tools. This isn't a studio multitrack session, and it was never going to be. Set your expectations there and you won't be disappointed.
Cleaning up artifacts afterward
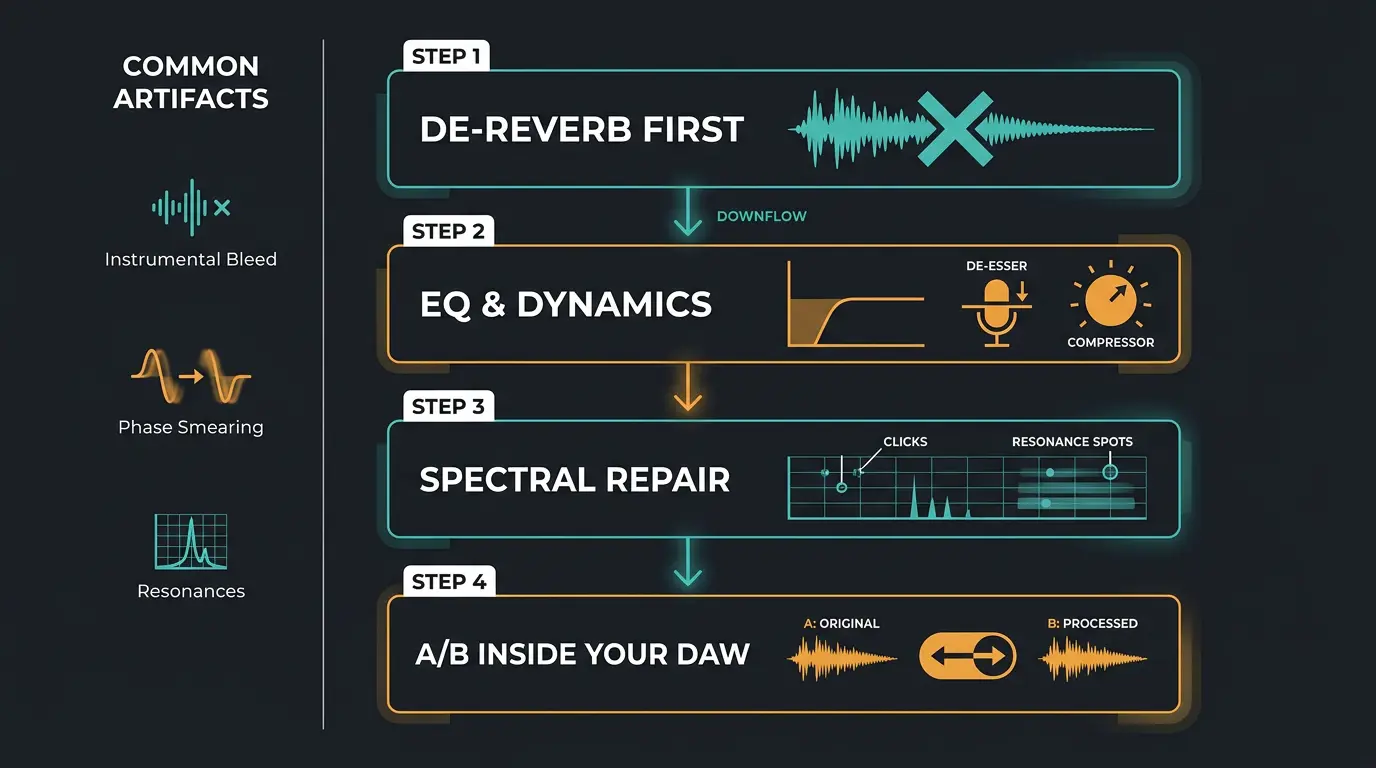
Here's the payoff, and the order genuinely matters. Expect a few things on an isolated vocal: instrumental bleed, phase smearing on reverb tails, and resonances where frequencies overlapped. You clean those in a specific sequence.
- De-reverb first. Enhancement and EQ both work better on a dry signal, so knock down the reverb before anything else. If you've got noise and reverb both present, de-reverb before you touch noise removal.
- EQ and dynamics. A low cut to clear the mud, then de-essing and gentle compression on the vocal to even it out.
- Spectral repair for the stubborn stuff. This is where a tool like iZotope RX earns its place — clicks, resonances, and leftover bleed that EQ can't reach.
Do this inside your DAW of choice so you can A/B as you go. If you're still setting up a workflow, our rundown of what a DAW actually is is a decent place to start.
Frequently Asked Questions (FAQs)
Can AI isolate vocals perfectly?
No. AI vocal isolation gets you a clean, usable vocal on most tracks, but it's not a studio multitrack. You'll hear minor artifacts — faint instrumental bleed on dense mixes, phase smearing on reverb, the odd resonance. Plan on some EQ and cleanup for pro use.
What's the difference between a vocal remover and a vocal isolator?
A vocal remover deletes the voice and keeps the instrumental, usually for karaoke or singing over a track. A vocal isolator does the opposite — it keeps the voice and drops the instrumental. Same underlying tech, opposite goals. Pick the tool that keeps what you actually want.
Does source file quality matter for AI vocal isolation?
Yes, a lot. Always start from a WAV or FLAC over a low-bitrate MP3. Lossy files introduce compression artifacts before the AI even touches them, and separation only amplifies whatever's already there. Garbage in, garbage out — feed it the cleanest source you have.
Why not just use phase cancellation to isolate vocals?
Because it barely works on modern mixes. Phase cancellation inverts one stereo channel and sums it, so it only cancels content identical in both channels. With reverb, widening, and stereo effects in play, that rarely covers the full vocal, and it strips your center-panned instruments too.
Should I isolate more stems to get a cleaner vocal?
No — fewer stems is cleaner for a pure vocal. Every extra stem the model separates at once means more bleed leaking into each output. A 2-stem vocal/instrumental split generally beats a 6-stem split when the voice is all you're after.
Final Thoughts
AI vocal isolation went from a phase-cancellation guessing game to a one-minute job, and that's a real jump. But the tool is only half of it. Your source file, your model choice, and the cleanup you do afterward decide whether you end up with a usable vocal or a ghost with a kick drum haunting it.
So start clean, stay in 2-stem mode when you want the voice, and give every result a listen before you trust it. The AI does the heavy lifting — the good judgment is still yours.
Some of the links within this article are affiliate links. These links are from various companies such as Amazon. This means if you click on any of these links and purchase the item or service, I will receive an affiliate commission. This is at no cost to you and the money gets invested back into Audio Sorcerer LLC.